Custom Filters And Tags Reference
Some of the features we use in pages and reports are ones we added rather than ones that came with the framework we’re using, Django. In other cases we’ve overridden built-in filters to add more functionality.
Filters in Django are typically written as {{ value|filter }} or {{ value|filter:"arg" }}. In other words, the filter acts on the value and may or may not take an argument (arg).
Template tags in Django are typically written as {% tag_name argument1 argument2 ... %}, where tag_name is followed by zero or more arguments which may be either optional or required.
Filters
Arithmetic Filters
Many of the filters in this section were designed to act on Query Report results. Our report results that return a single value are wrapped in a <span> html tag. For example, a variable containing a report result would actually hold <span class="query-">555</span> not ‘555.’ While the HTML will render invisibly, built-in filters like add and subtract cannot handle a such a string. Many of our filters will strip away the HTML tag to pull out the report value.
More precisely, the filters extract the first occurrence of an integer or real number.
Note that this will extract numerals from your Query Report’s Short Name if you are using the default query template, which will give you unexpected results!
For other situations when an input must be an integer, see strip_nondigits.
add
The filter add returns the sum of the argument and the value. This overrides Django’s built-in filter which works on integers only. This filter can extract a number from the value and argument and add both floats and integers, rounding results to two decimal places (for adding dollar amounts, for example).
For example:
if a is
<span class="query-">25.50</span>and b is30a|add:breturns 55.25
See also:
at_least
The filter at_least returns the value as long as it’s greater than or equal to the argument.
For example:
if suggested_ask is
100and value is250{{ suggested_ask|at_least:250 }}returns 250.
at_most
The filter at_most returns the value as long as it’s less than or equal to the argument.
For example:
if suggested_ask is
3200and value is2800{{ suggested_ask|at_most:2800 }}returns 2800.
commify
The filter commify renders a numeric value with commas as the thousands separator. This filter currently only works on integers, but like arithmetic filters above it will extract an integer from a string containing non-numeric characters.
humanize_seconds
The filter humanize_seconds takes a numeric argument (as a string or an integer) of a number of seconds and converts it to a smart string of the form “X days, X hours, X minutes, X seconds” with an appropriate level of detail (no more than two units).
For example:
{{ 5982|humanize_seconds }} and {{ 200000|humanize_seconds }}return ‘1 hour, 39 minutes’ and ‘2 days, 7 hours’, respectively
mod
The filter mod returns the integer remainder of the value divided by the argument. Value and argument are coerced to be integers and this essentially exposes Python’s % operator to you.
For example:
'35'|mod:'4'returns 3
multiply
The filter multiply returns the product of the value mutiplied by the argument.
For example:
{{ suggested_ask|multiply:"2" }}returns the user’s suggested ask as defined on your page times two.
divide
The filter divide returns the quotient of the value divided by the argument.
For example:
{{ suggested_ask|divide:"2" }}returns the user’s suggested ask as defined on your page, divided by two.
Hint
You can limit the number of decimal places displayed by a
divideby using Django’s built-infloatformatfilter:{{ suggested_ask|divide:"2"|floatformat:2 }}
number
The filter number returns the value as a float or integer if possible, or an empty string if the value is not a number. This can be useful when you want to ensure your values are numbers when doing comparisons, since making comparisons on text usually gives nonsense results.
For example:
{% with "23" as days %}
  days alone: {% if days < 366 %} Less than 366 {% else %} 366 or more {% endif %}
  days|number: {% if days|number < 366 %} Less than 366 {% else %} 366 or more {% endif %}
{% endwith %}
In the first example, the text “23” is being compared to the number 366, which gives the nonsense answer “366 or more”. Using the |number filter in the second example gives the correct, expected result.
percent_of
The filter percent_of returns the value divided by the argument, formatted as a percentage with one decimal place.
For example:
If value is 72 and argument is 499
{{ value|percent_of:argument }}returns ‘14.4%’
See also:
percent_of2
The filter percent_of2 functions like percent_of but returns the percentage formatted to two decimal places.
See also:
subtract
The filter subtract returns the difference of the value and the argument. Like add, this overrides Django’s filter.
See also:
Miscellaneous Filters
chart_data
The filter chart_data takes a list of numeric values and returns a comma-separated string for use in the Google charts some of our built-in Dashboard Reports use. If value has more or fewer than 12 elements, items are truncated from the left or zeroes are padded onto the right.
See also:
chart_data_misc
The filter chart_data_misc takes a list of numeric values and returns a comma-separated string for use in the Google charts some of our built-in Dashboard Reports use.
chart_labels
The filter chart_labels takes a list of numeric values and returns a pipe (‘|’) separated string for use in the Google charts some of our built-in Dashboard Reports use.
chart_spacing and chart_scale
These filters are used in the Google charts in some of our built-in Dashboard Reports. They act on the chart data in order to determine an appropriate y-axis scale and y-axis spacing for the chart.
country_names
The filter country_names takes a string consisting of a two-letter ISO language code, for example ‘en’ or ‘fr’ or ‘pl.’ It returns a list of tuples, with tuples of the form (<english country name>, <country name in the given language>) for each country.
For example:
{{ 'fr'|country_names }}returns a list with elements such as (
u'Poland', u'Pologne').
date_add
Template filter which adds the given offset to a datetime value.
Supports all the parameters of dateutil.relativedelta.
Assuming
dt = date(2016, 01, 19){{ dt|date_add:"months=1 days=3"|date:"Y-m-d" }} => "2016-02-22"
Note that plurals add (or subtract), while singular values replace:
Assuming
dt = date(2016, 01, 19){{ dt|date_add:"month=6 day=23"|date:"Y-m-d" }} => "2016-06-23"
This can be used with ActionKit’s right_now template tag (which creates a
now variable), but not Django’s built-in now template tag.
Using all these together, the first Thursday of the next month:
Assuming
now = date(2016, 01, 19){% right_now %} {{ now|date_add:"months=1 day=1 weekday=3"|date:"l, Y-m-d" }} => "Thursday, 2016-02-04"
Note
In a bulk mailing context, `` event.starts_at`` is a string not a date object. To use a date or date_add filter on events, use the variable event.obj.starts_at, e.g. event.obj.starts_at|date_add:"hours=3"
days_past
The filter days_past can be used in your dashboard reports to generate a list of timestamps for the last several days, the number of which is specified by the argument. The value supplied to the filter must be a Python datetime object. You can use this to build a table or Google chart of data by day.
For example:
if now holds datetime.now() and the present time is ‘2013-01-15 20:00:00’,
{{ now|days_past:6 }}returns [‘2012-01-10 00:00:00’, ‘2012-01-11 00:00:00’, ‘2012-01-12 00:00:00’, ‘2013-01-13 00:00:00’, ‘2013-01-14 00:00:00’, ‘2013-01-15 00:00:00’]
See also:
make_urls_absolute
This filter takes an HTML string for its value and tries to convert relative URLs into absolute ones. Takes a True/False argument for whether to use SSL.
month_ago
The filter month_ago acts on a MySQL style datetime value and subtracts one month.
For example:
{{ '2012-06-01 15:15:30'|month_ago }}returns ‘2012-05-01 15:15:30’
See also:
month_year
The filter month_year acts on a MySQL style datetime value to return a prettified Month Year string we can use in monthly reports.
For example,
{{ "2010-06-01 01:02:03"|month_year }}returns “June 2012”.
months_past
The filter months_past is used in the built-in progress report dashboards to generate a list of the last several months, the number of which is specified by the argument. The value supplied to the filter must be a Python datetime object. This can be used to build a table with a row of data for each month or to build a table for a Google chart.
For example:
if now holds datetime.now() and the present time is ‘2012-06-01 19:00:00’,
{{ now|months_past:12 }}returns [‘2011-07-01 00:00:00’, ‘2011-08-01 00:00:00’, ‘2011-09-01 00:00:00’, ‘2011-10-01 00:00:00’, ‘2011-11-01 00:00:00’, ‘2011-12-01 00:00:00’, ‘2012-01-01 00:00:00’, ‘2012-02-01 00:00:00’, ‘2012-03-01 00:00:00’, ‘2012-04-01 00:00:00’, ‘2012-05-01 00:00:00’, ‘2012-06-01 00:00:00’]
See also:
months_pastyr
The filter months_pastyr has been deprecated. Please see months_past.
months_until
The filter months_until has a specific use in the built-in progress report dashboards. It acts on a Python datetime object that holds the current time, and returns a list that can be iterated over with an entry for each month in the calendar year up to now.
For example:
if now holds datetime.now() and the present time is ‘2012-06-01 19:00:00’,
{{ now|months_until }}returns [‘2012-01-01 00:00:00’, ‘2012-02-01 00:00:00’, ‘2012-03-01 00:00:00’, ‘2012-04-01 00:00:00’, ‘2012-05-01 00:00:00’, ‘2012-06-01 00:00:00’]
See also:
weeks_past
The filter weeks_past can be used in your dashboard reports to generate a list of timestamps for the last several weeks, the number of which is specified by the argument. The value supplied to the filter must be a Python datetime object. You can use this to build a table or Google chart of data by week.
For example:
if now holds datetime.now() and the present time is ‘2013-01-15 20:00:00’,
{{ now|weeks_past:6 }}returns [‘2012-12-11 00:00:00’, ‘2012-12-18 00:00:00’, ‘2012-12-25 00:00:00’, ‘2013-01-01 00:00:00’, ‘2013-01-08 00:00:00’, ‘2013-01-15 00:00:00’]
See also:
Template Tags
DATA ONLY: A special Dashboard Report mode
Normally, a Dashboard Report will present a Query Report using the Query Template configured for the latter.
However, sometimes it is desirable to reformat an existing Query Report differently. Doing so in a
Dashboard Report may be accomplished by turning on data_only mode:
{% report "colors_sold_by_day" with "1" as data_only %}
When invoked this way, instead of the rendered report being included in the page, the underlying data will be made accessible. This allows you to create a different template for your dashboard report without the need to create a new query template.
The query report data will be made available via a context variable with the same name as your report.
The report columns will be available via the key column_names, and the data rows via rows.
For example:
{% report "colors_sold_by_day" with "1" as data_only %}

My Report Columns: <br/>
{% for column in colors_sold_by_day.column_names %}
    Column: {{ column }} <br/>
{% endfor %}

<h2>My Report Rows</h2>
{% for row in colors_sold_by_day.rows %}
    <h3>Row #{{ forloop.counter }}:</h3>
    <ul>
    {% for data_col in row %}
        <li>{{ data_col }}</li>
    {% endfor %}
    </ul>
{% endfor %}
Note that data_only mode will work equally well with either report or pivot_report tags.
Hint
By using a {% with %}...{% endwith %} block around your report or pivot_report tag, you can set
multiple report parameters at the same time, in an easy-to-read format. For example:
{% with data_mode=1 pivot_mode="average" pivot_heading="My Things" some_query_param="foo" another_report_param=3 %}
    {% pivot_report "my_special_report" %}
    {% for row in my_special_report.rows %}
        ......
    {% endfor %}
{% endwith %}
Miscellaneous Template Tags
concatenate
The concatenate tag allows you to to assemble several variables and bits of text and store the result in a new variable which is named at the end after as.
You can optionally pass a separator to include between each value.
For example, if the value of page.id is currently 42, the below would output foo 42 bar:
{% concatenate "foo" page.id "bar" separator=" " as quux %}
{{ quux }}
localtime
The tag localtime formats a particular datetime value, say an updated_at column or {{ now }} above, according to a particular format string or relative_time which smartly picks a format from 1:30 am, Jan 31, or Jan 31 2009. For example:
{% localtime object.updated_at "m/j/y, P" %}
log_context
{% log_context %} is a convenience template tag to be used when developing a mailing or page that uses context data. When included in your mailing or page, the current context is written to your browser’s Developer Console as JSON upon rendering. Note that you must be logged into your ActionKit admin, and that for pages, it’s necessary to use the templateset previewer.
Keep in mind {% log_context %} is most useful when trying to determine what snippets are available to use on a page or mailing, and is not a key-value store of all of the data. Whenever you see a key with the value <type 'instancemethod'>, that’s a sign that you could use a snippet to generate data from that key.
For example, see this screenshot of a (partial) log output from using {% log_context %} on a mailing.
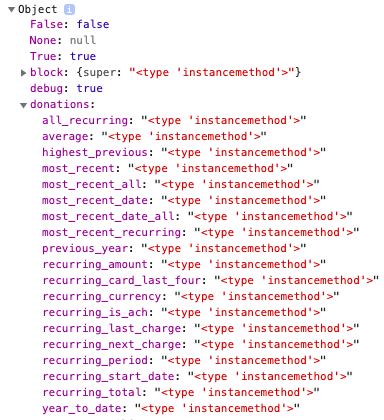
But what is available from {{ donations.most_recent_recurring }}? We can use this snippet in conjunction with .as_dict to get a representation of that object as if it were a key/value store. For example, using {{ donations.most_recent_recurring.as_dict }} returns
{'status': u'active', 'card_num': u'4321', 'period': u'months', 'start': datetime.date(2019, 8, 1), 'amount': Decimal('5.45'), 'recurring_id': u'abcdefghi', 'exp_date': u'1220', u'id': 4}
once
Use the tag once to wrap template code that will only be rendered one time.
In the below example, the “cool” text will only show up once, even if the list has multiple matching items:
{% for item in list %}
  {% if item.is_cool %}
    {% once %}
      Here's one cool thing {{ item.name }}
    {% endonce %}
  {% endif %}
{% endfor %}
record
The tag record is takes a specified value or variable and append it to a specified list. The list is created if necessary, and an optional argument reportresult will tell the template tag to extract an integer result from an HTML tag. This tag can be used within a for loop to build a series of report results at different points in time or for different pages.
For example:
{% record reportresult progress_users in series_users %}
appends the current value of {{ progress_users }} to the list {{ series_users }}, creating it if necessary.
remember
Normally, variables stored by tags such as concatenate or store are not available outside of the current template block. This means that a variable stored in a block, or inside an included template, can not be accessed in other blocks or included templates.
The remember tag allows a variable’s value to be retrieved outside of the scope of the current template block.
For example, the below template will output the last value in the loop:
{% for val in values %}{% remember val as last_value %}{% endfor %}
{{ last_value }}
required_parameter
The tag required_parameter is an information tag used in reports to indicate to ActionKit that a parameter is required from the user. For example, our built-in dashboard event_report contains:
{% required_parameter "campaign_name" %}
ActionKit sees this and prompts the user to enter a value for campaign_name. After using the above tag, the variable {campaign_name} is available in the report (note the single braces).
For more information, see input parameters in the report .
requires_value
The tag requires_value takes one argument, and raises a Template Syntax Error if the value of the argument is not available or resolves to False. This is useful in mailing snippets.
For example,
{% requires_value targets.count %}
ensures that code involving targets will display in that email.
right_now
The tag right_now creates the variable {{ now }} that contains the Python datetime object datetime.now(). You would include this once in your template as
{% right_now %}
before using filters like now|months_until and now|months_past.
Right_now also adds to context a variable {{ months_for_chart }} that is necessary to create the x-axis for our month-by-month bar graph charts used in certain dashboards.
select_index
The tag select_index takes a list, an index, and a variable name to save list[index] to.
For example:
{% select_index dogs 3 as dog %}
store
The store tag allows you to to evaluate a block of template code and store the result in a new variable.
For example, if the value of page.id is currently 42, the below would output foo 42 bar:
{% store as quux %}foo {{ page.id }} bar{% endstore %}
{{ quux }}
users_near_location
{{ users_near_location }} is available for use in query reports and returns the IDs of users in the specified radius around a zip code or U.S. city. It can be used like:
select first_name, last_name from core_user where core_user.id={ users_near_location }.
The person running the report is prompted for a place and a radius. The place can be entered as a single zip code or a city and state, or a list of either separated by commas or semicolons. The radius is in miles and defaults to 20 miles if no value is entered.
When querying for U.S. users {{ zip_proximity }} is a better template tag to get at this data. {{ users_near_location }} is useful for querying users outside the U.S. or if a user profile doesn’t contain a zip code. {{ users_near_location }} won’t scale to many thousands of users. So if querying around a large city, like New York or San Francisco, using {{ zip_proximity }} will work better.
We added a sample report with {{ users_near_location }} called phone_by_zip_radius so you can see how it works.
You can also use this tag plus parameters of place (required) and radius (optional) in this format: {{ users_near_location:place=90210,radius=50 }} to retrieve the IDs of users within a specified radius of a zip code without prompting the staff user for place and radius. For example:
select first_name, last_name, city, type, phone

from core_user

join core_phone on(core_user.id = core_phone.user_id)

where core_user.id={{ users_near_location:place=60625,radius=20 }}