Events
Event Campaigns
Campaigns are at the core of our event system. For distributed events, whether your staff or your users will be acting as hosts, the campaign is the bucket that contains related individual events. For a single staff-run event, there’s only one event in the campaign but you still have to create a campaign.
Event Campaigns List
Click the Events Campaigns button on the Pages Tab in the tools menu on the right to quickly access a list of all your event campaigns.
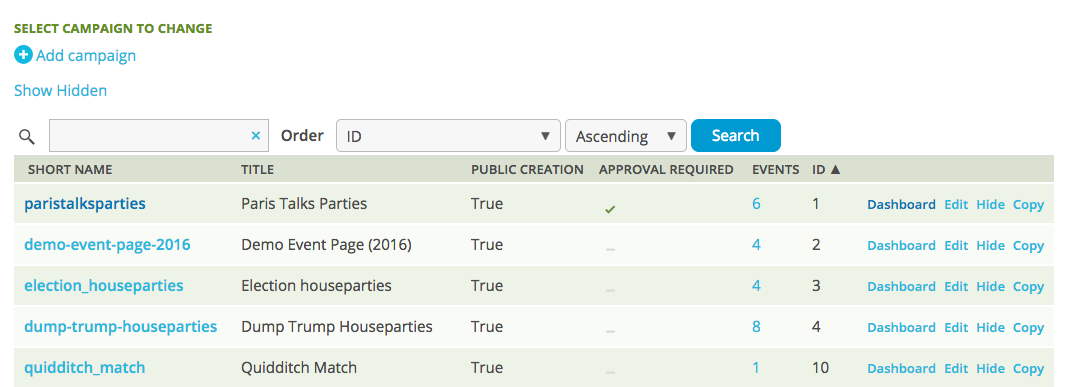
From this screen you can:
See a count of the number of events in each Campaign.
Access the Campaign Dashboard for a particular campaign.
Search for and sort event campaigns.
Edit, copy, or hide the campaign.
Add a Campaign
Click Add Campaign on the Campaigns List or click Add Page and Event from the Pages Tab.
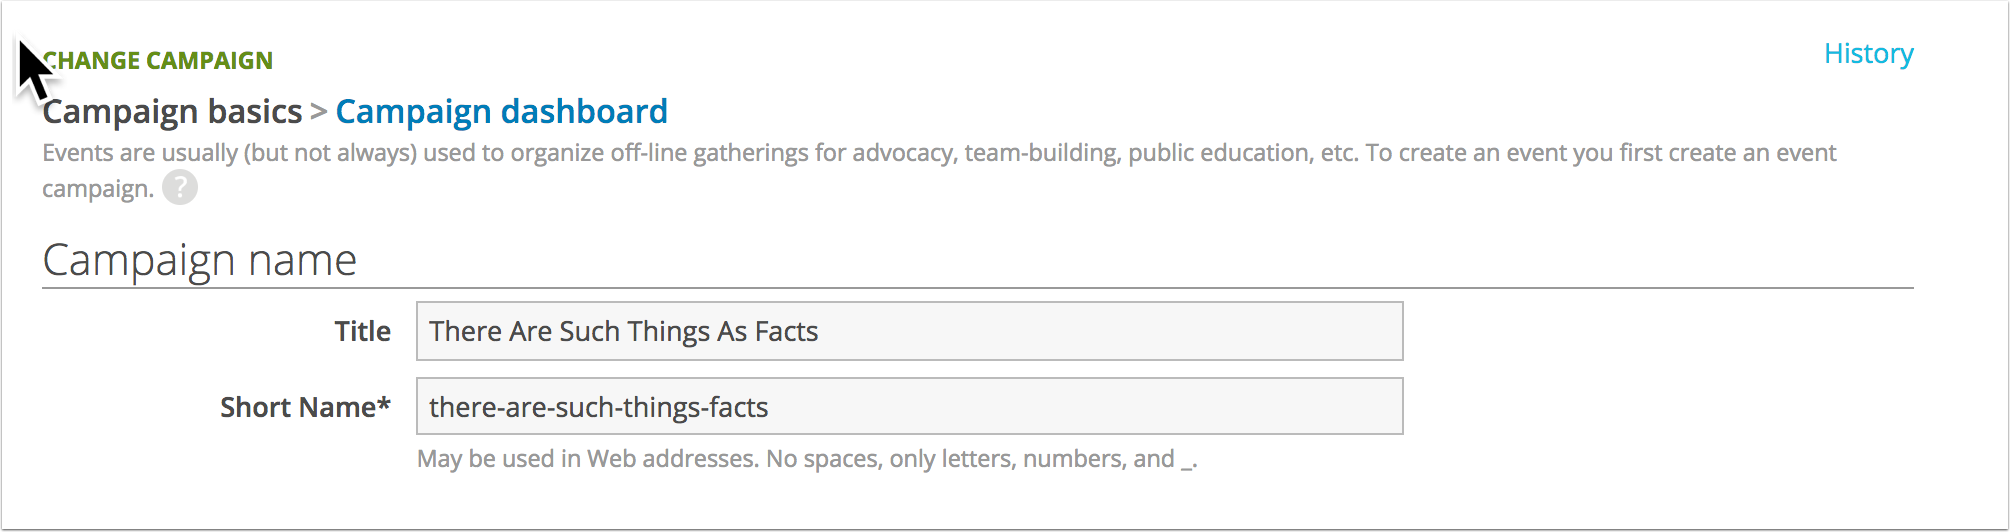
Campaign Settings
Either way, you’ll land on the Add Campaign screen. If you’ve been creating pages in ActionKit, you’ll notice that Events are a bit different. First you create the Campaign and related settings on this screen, then you’re directed to the Campaign Dashboard to create your pages.
For your Campaign, you need to enter a title and a name. As with other page types, we’ll generate a valid short name for you from the title but you can change it by typing over it. The title displays on most pages (unless you allow the host to use their own) and the name is used in the event page URLs.
There are four sections:
-
These settings affect the options available for your hosts when they set up an event.
-
These settings affect what’s displayed to users searching for a nearby event.
-
This option allows you to link the campaign to others so that users can search them all at the same time.
-
These settings you to recruit volunteers to assist with moderation of event listings.
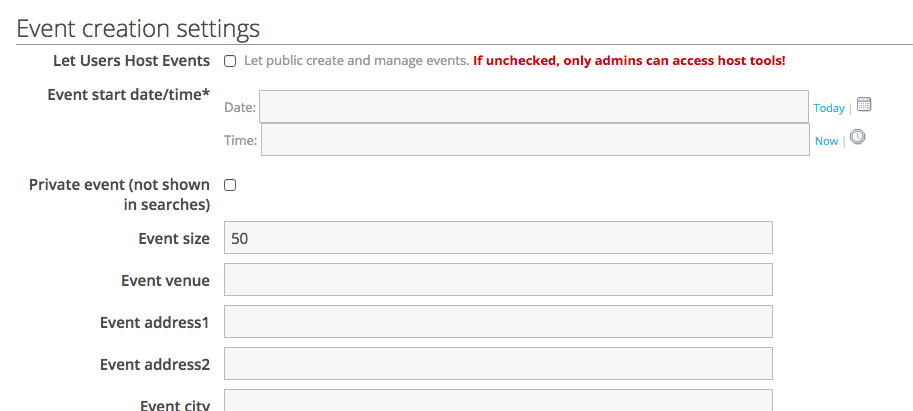
Event Creation Settings
These settings determine the options available to users on the Event Creation Page.
The options are:
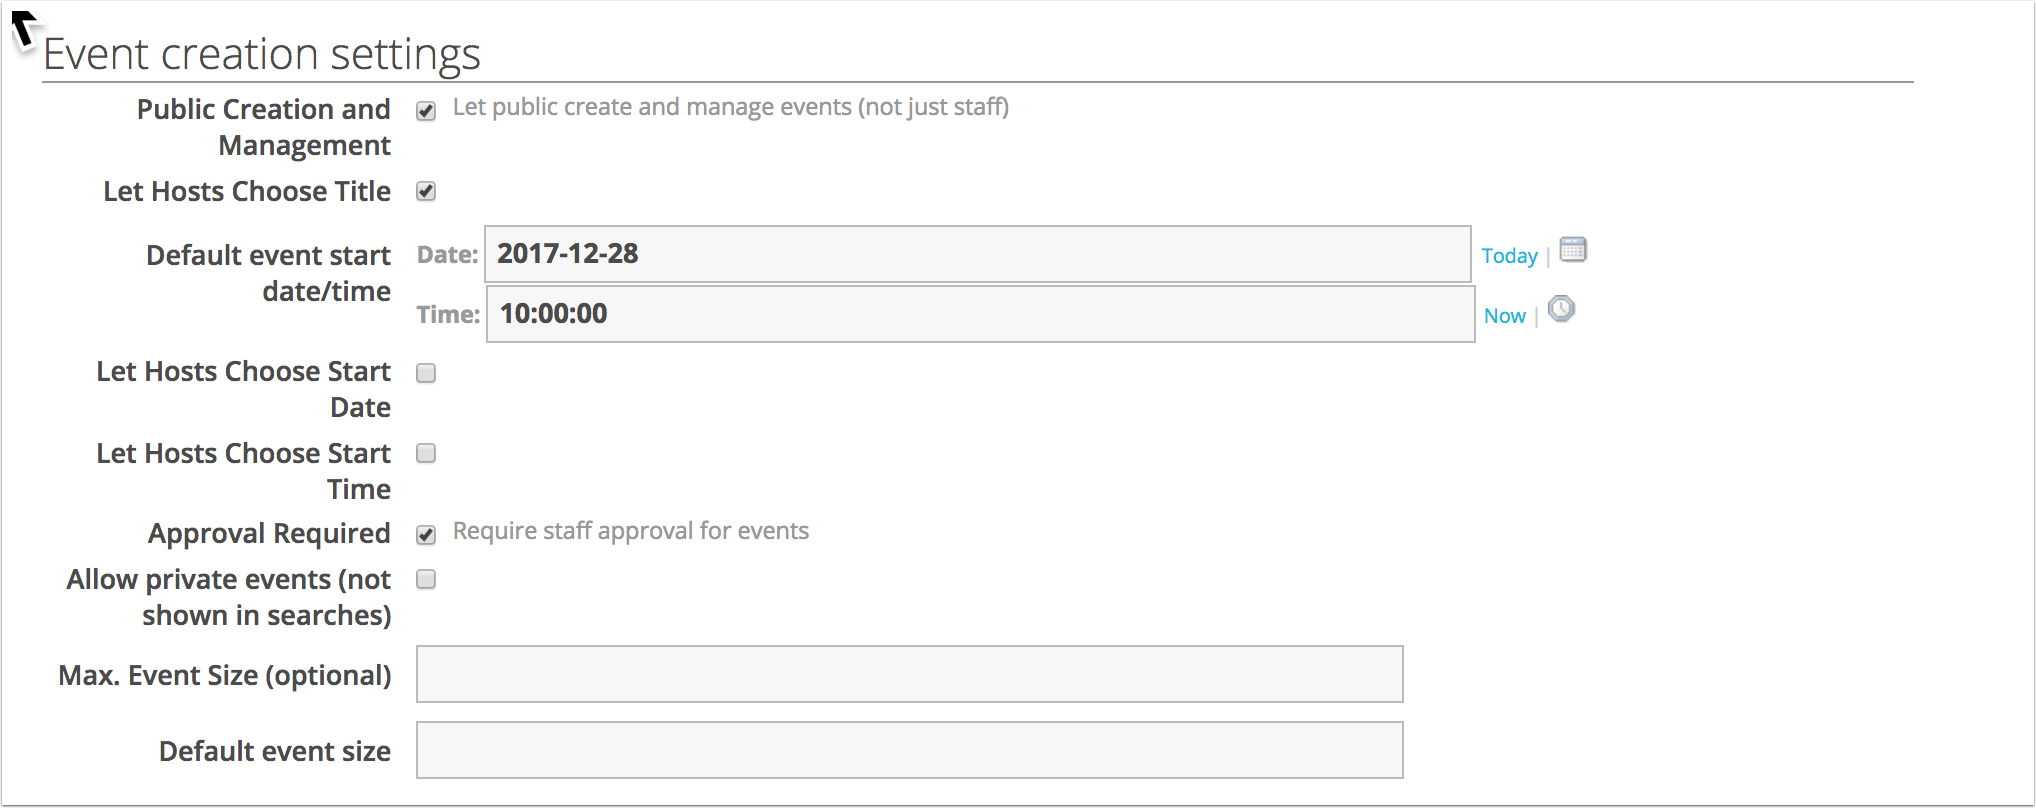
The first question is whether you’ll allow end users to host events. The other questions all relate to the settings available to hosts.
Let public create events (not only staff)
If you want your users be able to host or co-host events in their communities, leave this box checked. If you uncheck this for an existing event campaign, non-staff hosts will no longer be able to access their event tools.
Uncheck the box and you’ll see a pop-up asking you if you want to create a single event.
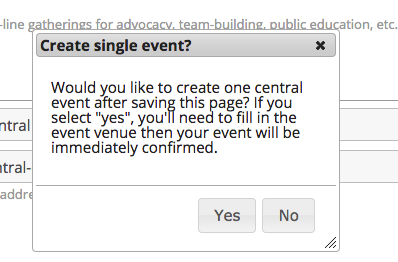
Staff-Run Events
One-off: If you select yes, you’ll enter the event venue and details and the event will be immediately confirmed. You will not need to create host pages.
Multiple: Select no if you are planning to create more than one event but the events will be staff driven. You’ll still create a host page where staff members will enter the details for each event.
Note
If staff members find they cannot create events, make sure they are using the email associated with their staff record on the Staff Tab.
Let hosts choose title
If this box is checked, the host can enter a name for their event. Otherwise, your title is applied to all events and the doesn’t display a field for the event name.
Default event start date/time
Your entry will be pre-filled when users go to create their own event.
Let hosts choose start date
If this is checked, users can type over your default date. Uncheck this to require hosts to use the default. (A default date is required if this box is unchecked).
Let hosts choose start time
See start date above.
Require staff approval
If this box is checked, a staff user must approve each event before it’s available for attendee sign up. On your Campaign Dashboard, you’ll see a link to all unapproved events so you can quickly find and review them.
Require Hosts To Confirm Email Addresses
If this is checked, event hosts must confirm their email address before their event is available for attendee sign up. This is the default behavior and generally a good idea since it means you will have a valid email address to communicate with your event hosts.
If you want, you can customize the confirmation email language by editing the confirmation email on the After-Action Info screen of your Event Create page. This example code will check whether hosts are required to confirm their email and display either “Please click the link below to access your host tools” or that you need to click the link before anyone can sign up for your event, as appropriate:
{% if action.event.campaign.require_email_confirmation %}
<b>Before anyone can sign up for your event, you'll need to click the link below to access your host tools and confirm your event.</b>
{% else %}
Please click the link below to access your host tools:
{% endif %}
Or if you prefer to disable the confirmation email entirely, you can uncheck the “Send Confirmation” checkbox on the After-Action Info screen of your Event Create page.
Allow private events
If you check this box, a host can create an event and only invite friends. Private events don’t show up in searches and aren’t included in attendee recruitment mailings.
Max. event size
Use this setting if you want to make sure all events are under a certain number of people. This can be helpful for meetings with a long agenda or where the purpose is for a small group to accomplish something. A host will be able to set a maximum size for their own event, up to this max event size.
If you leave this blank, there is no maximum set on the number the host can enter. If the host leaves their event max blank we interpret that as unlimited.
Once signups for an event reach the max, the event is hidden from search (unless the user is already attending or hosting) and the signup page won’t allow additional attendees to register, even with a direct link. Also, hosts and attendees are prevented from sending additional TAF invitations.
Default event size
Sets the default size for new events on the Event Creation page.
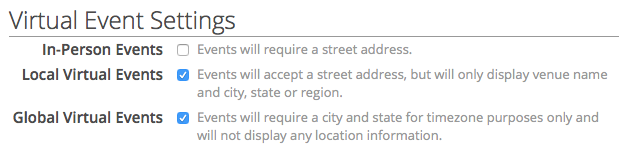
Virtual Event Settings
You can use ActionKit to organize virtual events that take place online rather than face-to-face at a physical location.
Some campaigns might consist of global virtual events for a worldwide audience, while others might have events with a local focus, or some combination of those. To enable virtual events for your campaign, select which types of event settings your campaign will contain.
The Virtual Event Settings are:
For additional information on virtual events, see the Online and Virtual Events section below.
Event Attend Settings
Although you may recruit most attendees by mailings with links to the closest events, you may also want to offer a search page, where users can search for events near them.
These settings define what’s displayed on the Event Search and Event Signup Pages. If the settings aren’t working as you expect, ask your designer to compare your templateset to the latest version of Original to see if something is missing.
By default the search box will allow your users to search by city name or zip. ActionKit will display any events within 50 miles of the city center. You can adjust this distance in the template. If the templateset you select when you create the event search page has a drop down where the user can select a country in the user form, the country drop down will be displayed on the search page automatically.
The Attend Settings are:
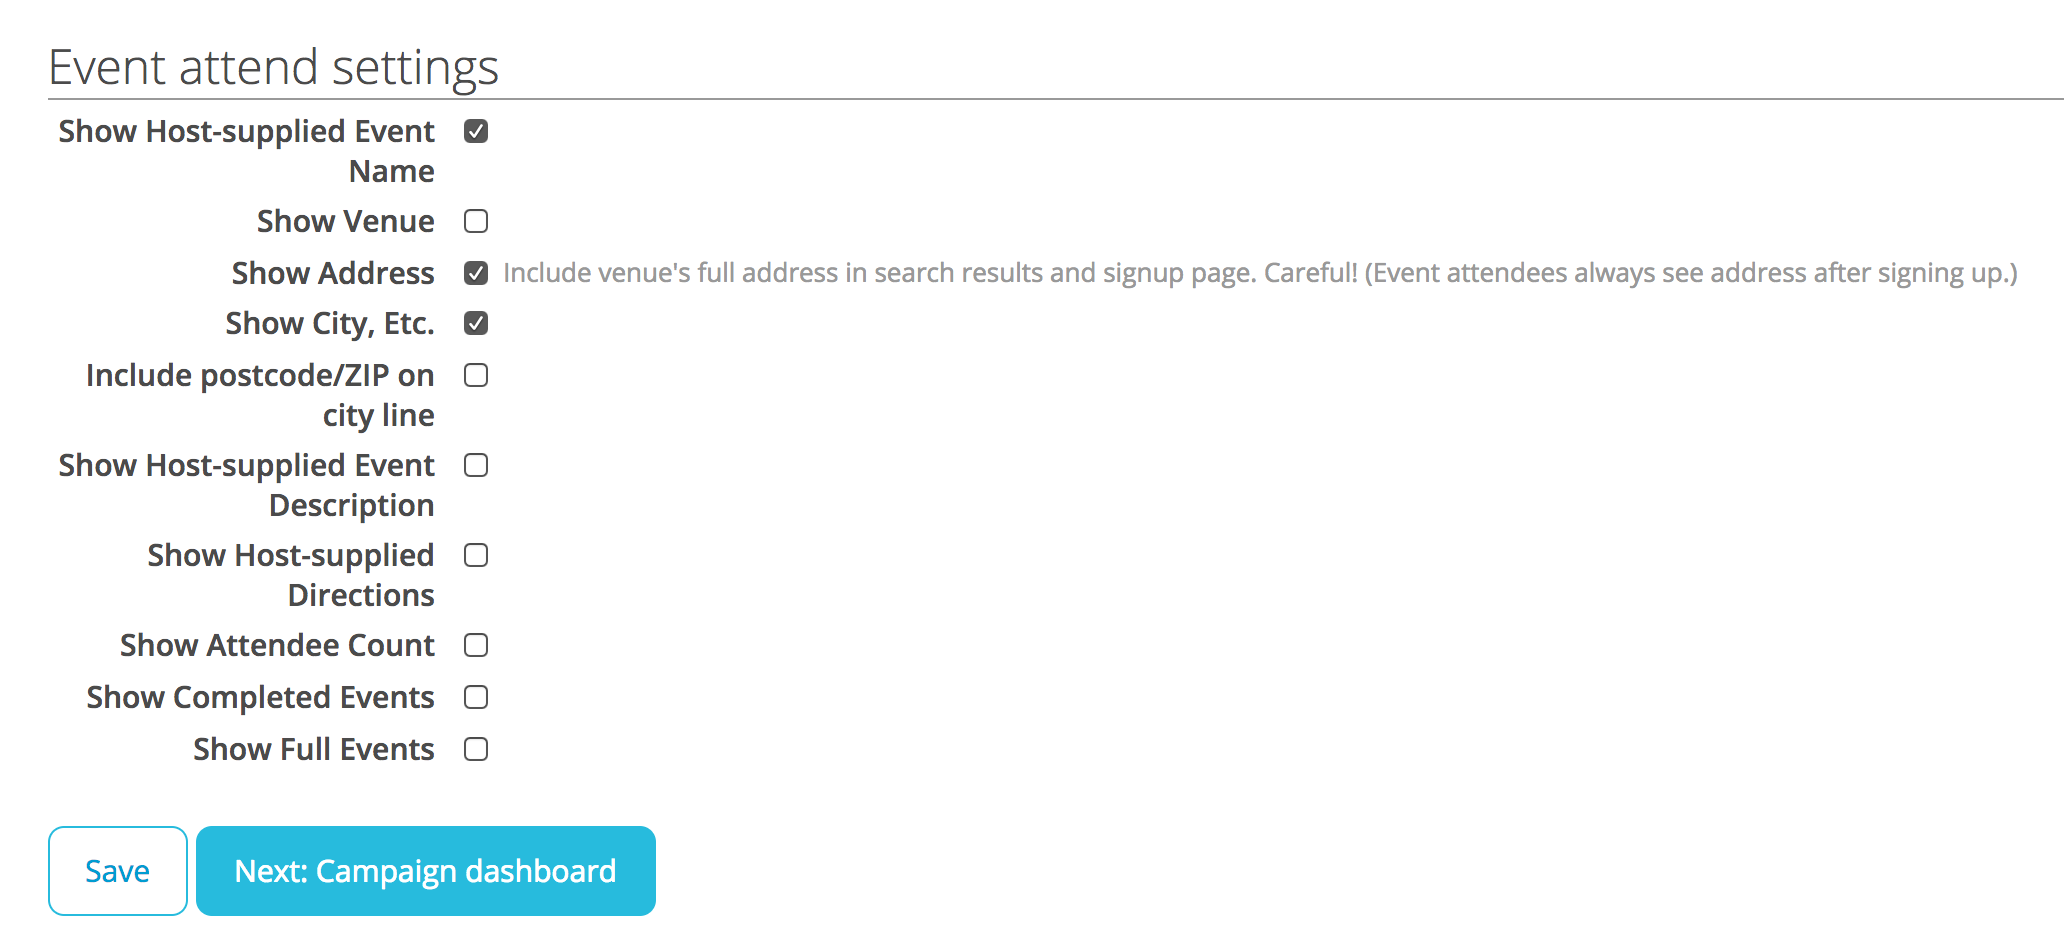
Show Host-supplied Event Name
Your title for the event campaign shows if you uncheck this or if a host doesn’t enter a name.
Show venue
This is most useful if your events are likely to be at public locations that are recognizable by name.
Show address
Many groups don’t display the address on the public search page because they don’t want to expose member addresses. If you do check this, end users will be able to see events on a map and choose the one closest to them. If you leave unchecked, in the search results we’ll show an estimated distance for each event from a centroid in the zip the end user enters.
Include postcode/ZIP on city line
If you check this box, the city, state and zip show on the search form.
Show Host-supplied Event Description
If you check this box, whatever the host has entered as the public description for their event shows in the search results. If you don’t, the hosts description is only displayed once someone signs up to attend.
Show Host-supplied Directions
If you check this box, the directions the host entered on the Event Creation page are displayed in the search results. If you don’t, they’re only displayed once someone signs up to attend.
Show Attendee Count
Check this box to display a count of signups in the search results.
Show Completed Events
Check this box to include past events in the total event count at the top of the search page.
Show Full Events
Check this box to include full events in the total count at the top of the event search page.
Related Campaigns Settings
In some cases you may wish to show events from multiple campaigns on a single event search page.
The Related Campaigns settings are shown below:

If you select other event campaigns here, users who visit this campaign’s event search screen will also be able to search those other campaigns at the same time.
The event_search.html in the Original templateset includes some checkboxes which are displayed if you have any “also search” campaigns selected; depending on your templateset, these checkboxes may or may not be present. (You can include them by copying the portion of event_search.html that refers to also_search_campaigns, or you can remove them from your templateset if they are unwanted.) Unchecking those checkboxes allows users to narrow down the search to a smaller pool of campaigns.
When you save your choices on this page, you’re directed to the Campaign Dashboard, where you Create Your Event Pages.
Moderation Settings
Allow moderation
If you check this box, you enable volunteer event moderation. You will still need to create and configure the moderator signup and moderation pages on the Campaign Dashboard.
Allow moderator edits
If you check this box, moderators can change event location, time, etc.
Show notes
If you check this box, notes added by staff for a given event will be visible to event moderators.
Show moderation notification
If you check this box, a staff notification is sent for each moderation action. Notifications can be customized from the Notification list, and notifications for moderation actions can be selected on the After-action info screen for the campaign’s moderation page(s).
Create Your Event Pages
Under Pages on the Campaign Dashboard, you’ll see two buttons – one under Event Creation and one under Event Signup.
Start by clicking Set up now under Event Creation (unless you chose to create a one-off staff run event from the Host Settings screen).
You’ll actually be setting up two pages: the Event Creation Page and the Host Tools Page.
Do the same thing to set up your attendee pages – click Set up now under Event Signup. And again, you’ll be creating multiple pages: Event Search, Event Signup Page, and Attendee Tools Page.
Events also have a few other pages, like the screen the host lands on after creating an event, and transactional emails that are built into the system and send after a user action, like an email to attendees when an event is canceled. Read more about the settings for all of these and see samples of what they look like for your end users in the event pages & transaction emails section.
Uploading Events
You can create individual events within a campaign by uploading a CSV with details for each event. When creating many events, as might happen with a campaign of staff-run events, an upload is faster than creating events individually, and doesn’t require the set-up work of integrating with an API.
Managing Events
Now you’ve got some events in your campaign, whether uploaded, created through an Event Creation Page by users or staff, or created as a one-off while setting up your event campaign. ActionKit provides tools that staff members or volunteers with Pages level permissions can use to manage these events.
You’ll usually start at the Campaign Dashboard, which you can reach from the ‘Dashboard’ link on the Event Campaigns List or the ‘Dash’ link for one of your event pages. Or you can find an individual host’s event by searching for the user from the Users tab, then clicking through to the user’s action history and following the link to view events on the host action row.
Warning
Hiding an event page will disable it! For example, hiding an Event Creation Page will prevent hosts from creating new events; hiding an Event Signup Page will prevent attendees from signing up to attend an event; and so on.
Campaign Dashboard
From this screen you can edit your host and attendee pages (and, if enabled, your moderation pages), see event counts by status, search for and manage individual events and (again, if you enabled moderation) manage volunteers.
In the bottom section under Manage Events you’ll see links to all events and those in particular categories:
Open: Events that aren’t waiting for host confirmation or staff approval (if required). The count includes events that are full or over and so aren’t available for signups.
Waiting for host confirmation: After a host submits on the Event Creation Page, ActionKit sends them an email asking them to confirm. We’ve found that it’s useful to confirm that you have a valid email address before sending people to someone’s house. There are circumstances where enforcing this requirement doesn’t make sense (e.g. your grandmother who isn’t great with email is hosting an event or you’ve only emailed trusted volunteers the link to create an event). You can confirm for your host(s) from the Events List.
Waiting for staff approval: If you checked the “Approval required” box under Event Creation Settings, a logged in staff user needs to approve each event before it will be available for any signups. You can approve events from the Events List.
Cancelled or deleted: You can also delete events from the Events List and hosts can cancel events from their Host Tools Page.
Click on the number in any of these categories to see a list of matching events.
Below the event summary you’ll see a count of signups, including hosts, and a count of those who were marked as having attended.
Alternately, you can use the search box to find events by ID, by text (for example, in the title or notes) or by the host’s name or email.
Or, click advanced search to open up a section with more search criteria including:
Status: any, open for signup, waiting for confirmation or staff approval, cancelled or deleted. You can combine any of these with “future events only” or check that alone.
Privacy: any, private or public.
Location: limit by proximity to a place, or by country, or by state.
You can also set the order of the results to sort by the most recently created, by the soonest to start, or by largest events first.
After clicking a link or searching, you’ll land on the Events List screen where a list of matching events, with summary information on each event, is displayed.
Events List
The events list is a list of the events in this campaign that match your search criteria.
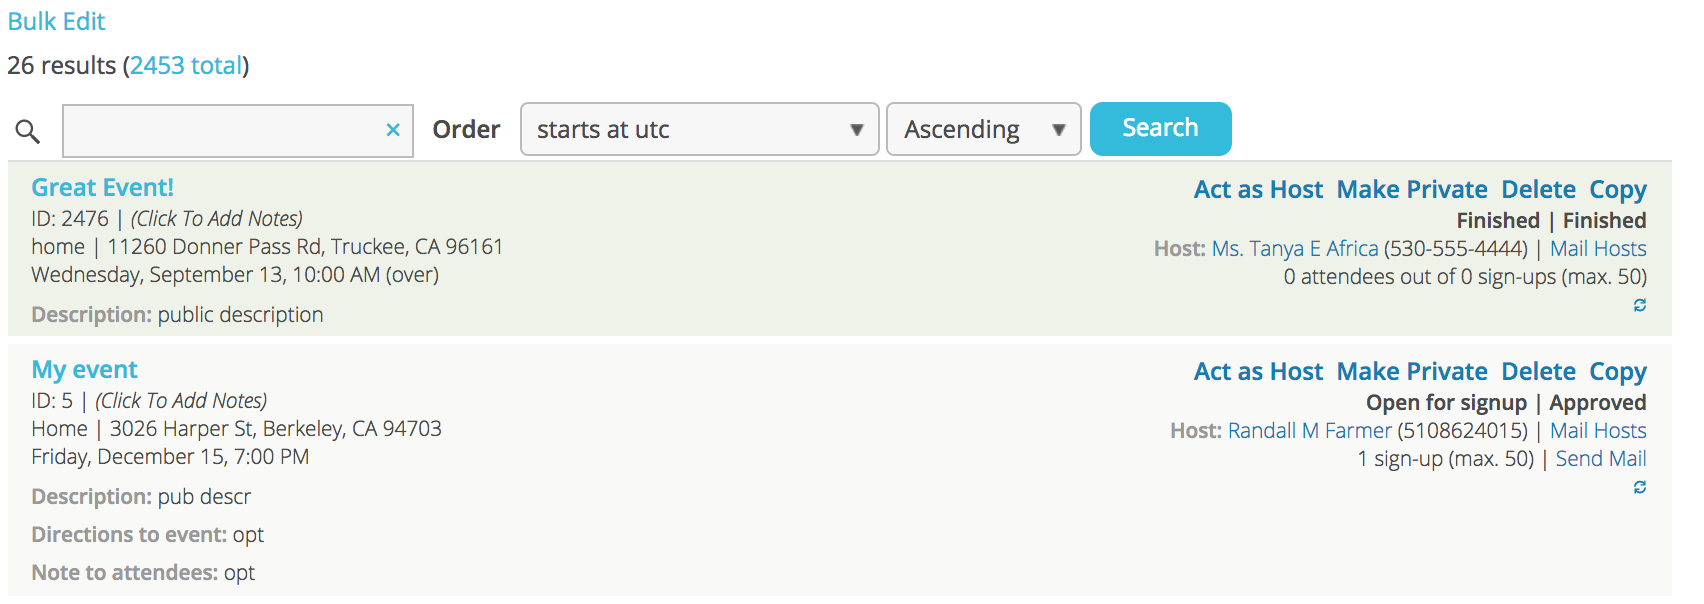
From the events list you can:
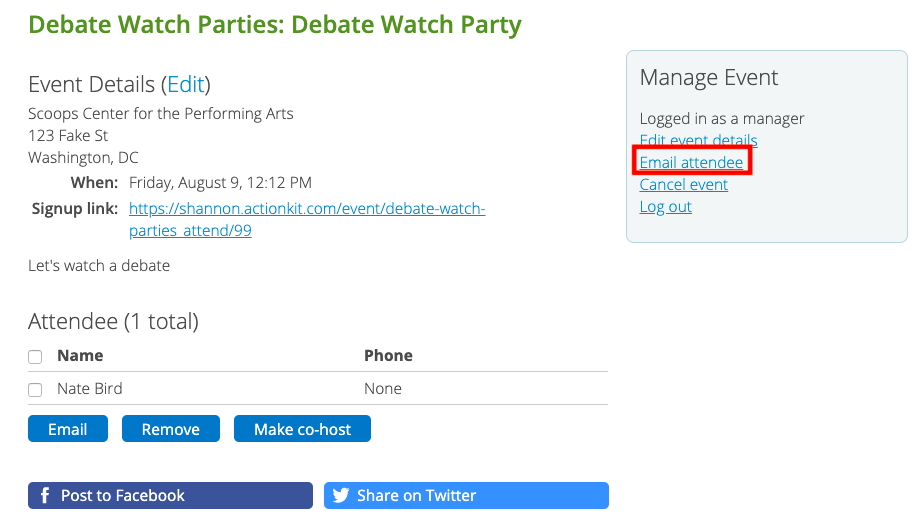
Manage event. This link lets you see event details including lists of hosts and attendees.
Confirm an event. This option is only displayed if the host hasn’t confirmed manually by following the link from their confirmation email. You may want to confirm the event from the admin if the user doesn’t get the email or is confused by it.
Re-send Confirmation Mailing. This option is only displayed if the host hasn’t confirmed manually by following the link from their confirmation email. If the host has not received the email asking them to confirm their event, you can have it re-sent to them. This is only available for recent event confirmation mailings sent after February 2019.
Approve an event. This option is only displayed if you required staff approval under Event Creation Settings and the event has been confirmed.
Act as host. This allows you to see the host tools and manage an event just as the host can.
Make an event public/private (the opposite of it’s current status).
Delete an event. Be careful – this is not reversible.
Copy an event. If you hit copy, you’re directed to the Event Creation Page, where the event information is prefilled.
Email the host. Click ‘Mail Hosts’ and you’ll see a pop up where you can enter a subject and message body. These emails are in a wrapper defined by the event_email_from_admin.html template, which includes a link to the host’s tools.
These emails are not tracked or saved.
Email attendees. If the event has sign-ups you’ll see a link to ‘Send Mail’. Click it and you’ll see the same pop up as for the host email. This email also uses the event_email_from_admin.html template, also is not tracked and links to the attendee’s tools.
Go to the host user record. Click the host’s name and you’ll be brought to that user’s record.
Add/edit notes Next to the event id, you’ll see a link to add or edit notes. These notes are only associated with this event, not with the host’s user record. They are visible to other staff users with access to the events list.
View the signup page. Click on the event title to reach the event’s signup page.
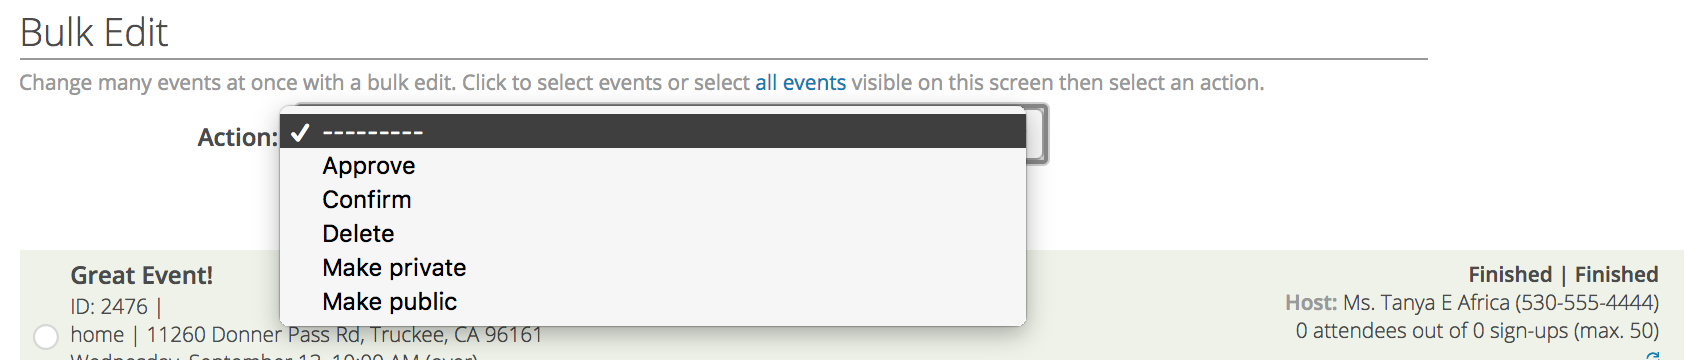
Bulk edit events. Click the link in the upper left and the standard bulk editing interface will appear.
Available actions are approve, confirm, delete, make public and make private. You can either select all events on the screen or check the circles on the left next to the events you want to apply the action to.
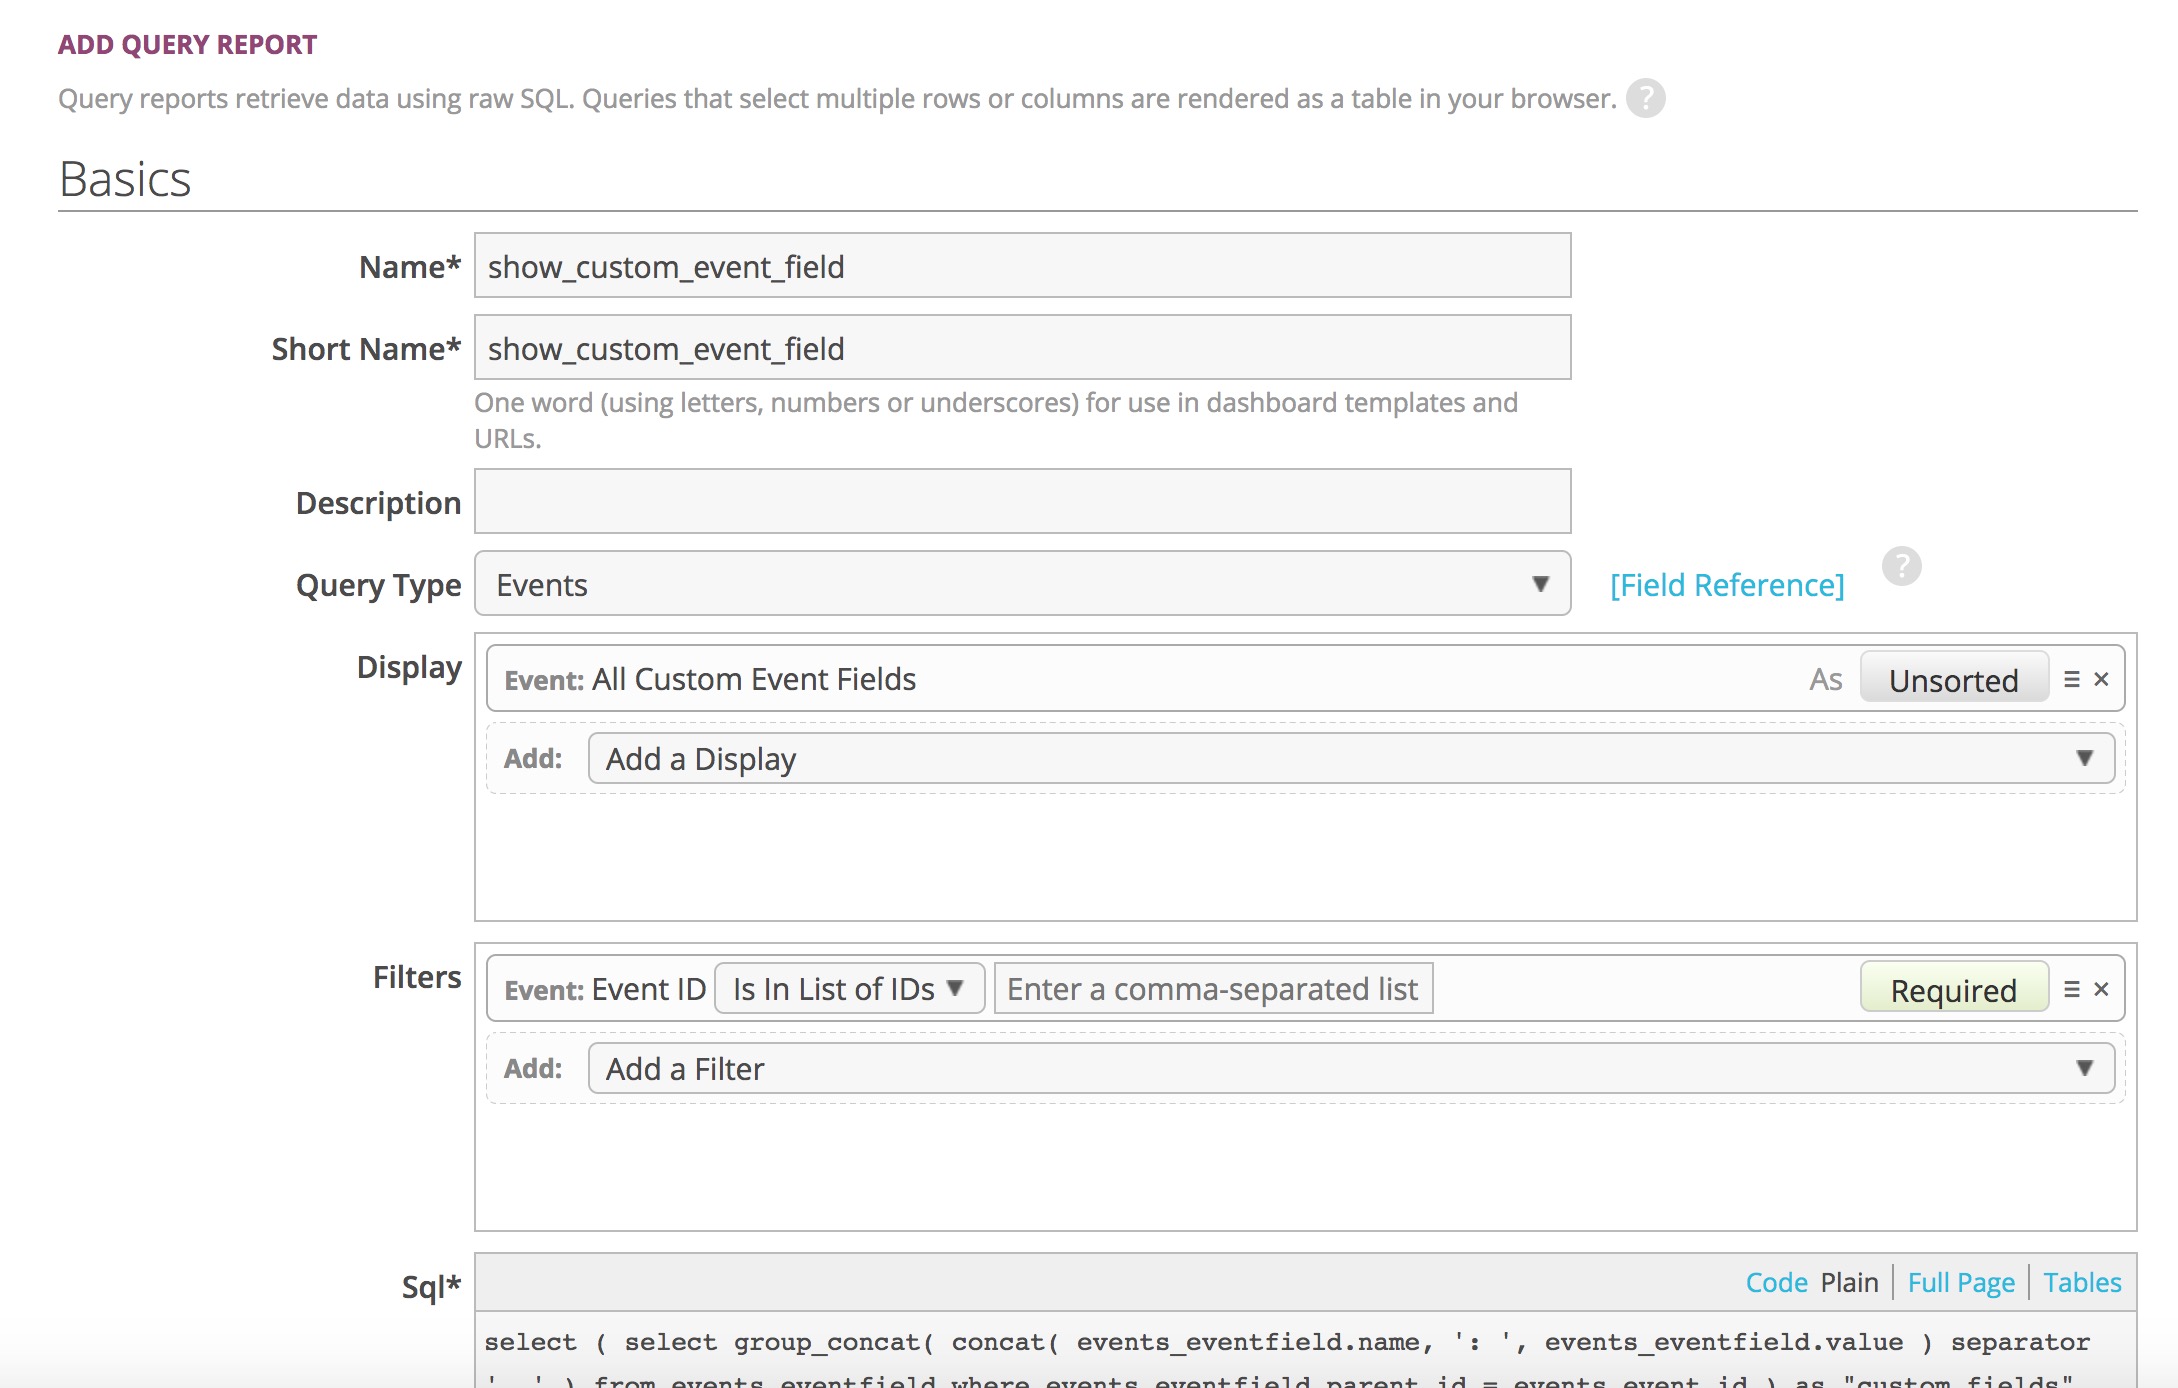
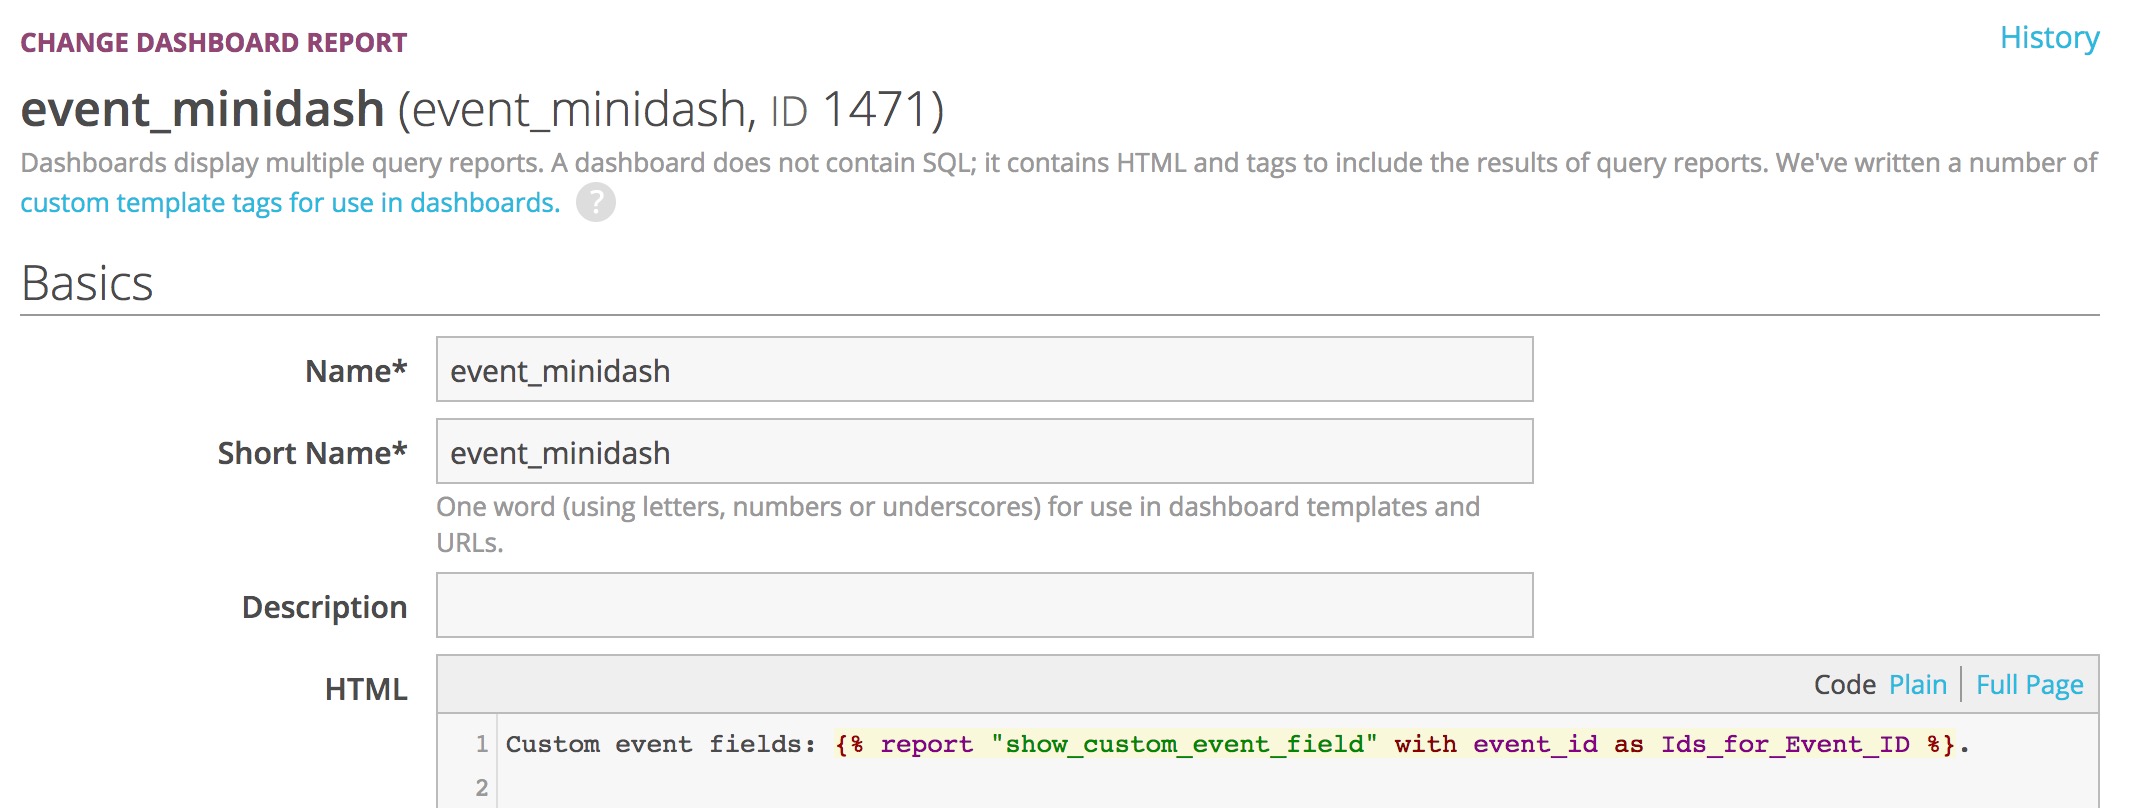
Event Minidash. Finally you can create a report that will display details you specify related to each event. This is one of several special reports you can use to customize the admin by creating a report and giving it a specific name.
You must name your report event_minidash. Results will be displayed for each event on the events list, receiving the current event’s {{campaign_name}} and {{event_id}} as parameters.
For example, if you were using a custom event field or an action field to ask the host to select an event type (see example), you could display the type for each event.

You’d do this with a query report, like:
Then you’d include that report in your event mini_dash, like:
Open Events
Events are open for signups if they’re:
Confirmed - Event hosts have to sign into their event tools to show that their email address is valid. If for some reason they can’t confirm a valid event (they never receive the email, for instance), you can click Confirm to make the event live anyway.
Approved - If, during campaign setup, you chose to require events to be approved by staff, you’ll have to click Approve to make each event live.
Not deleted or canceled - These events can’t be signed up for and don’t show up in searches. If you delete an event through the admin, the host and all of the attendees will get a message saying it’s canceled.
Public - Private events can be signed up for, but only if the event host sends the URL to their friends - they aren’t visible on the public search page, and won’t show up in recruitment mailings. As an admin, you can set an event to private if you don’t want it to be available for more signups but don’t want to cancel it yet.
Other Event Statuses
Cancelled - The host (or an admin acting as the host) canceled the event. Signups will have a status of
deletedin events_eventsignup.Deleted - An admin or event moderator deleted the event. Signups will have a status of
deletedin events_eventsignup.
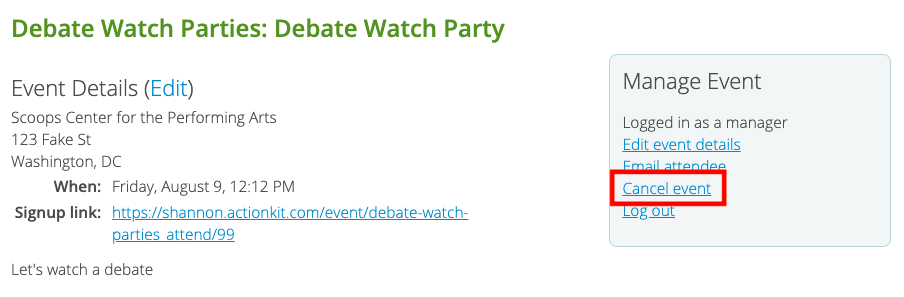
Event Details
The event details screen includes information from the event listing view as well as showing information about the hosts and attendees.
Additionally, it includes a link to merge this event with another event from the same campaign.
Event Dash. You can create a custom report that will display details you specify related to this event. This is one of several special reports you can use to customize the admin by creating a report and giving it a specific name.
You must name your report event_dash. Results will be displayed for this event just below the event basics and will display whatever information you specify. This dashboard report receives the current event’s {{ campaign_name }} and {{ event_id }} as parameters.
Notify Attendees when Event Details Change
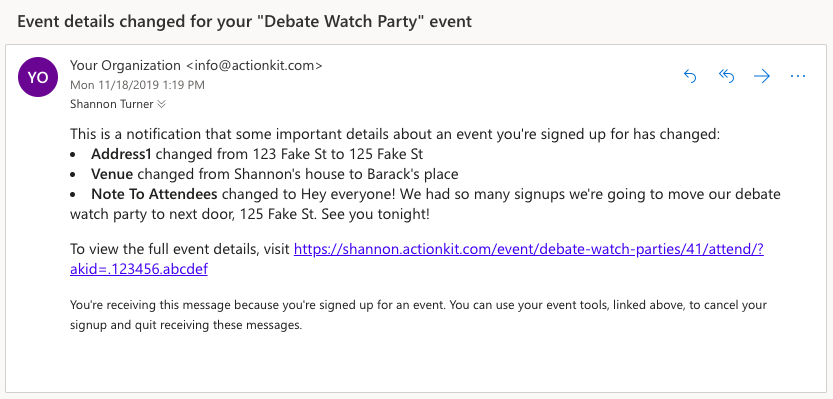
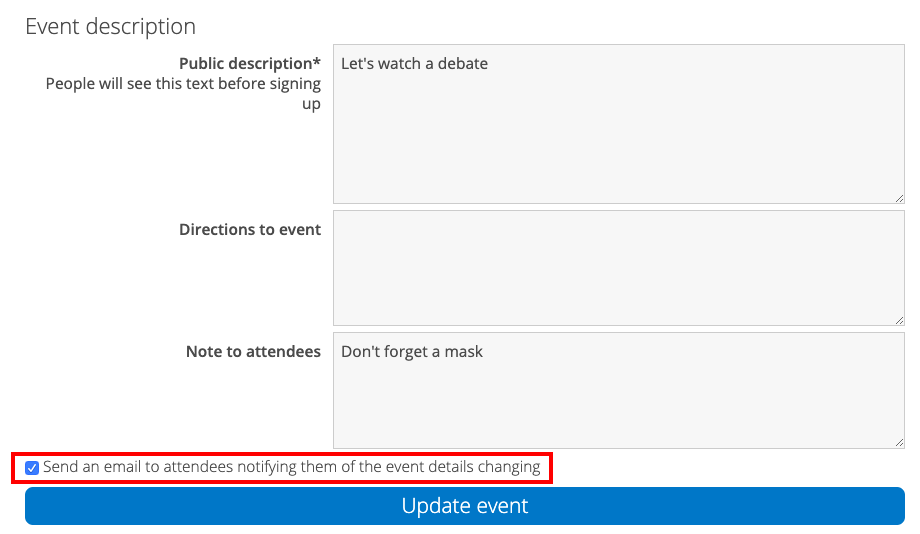
When important event details change, you can automatically send an email to hosts and attendees notifying them of the changes. This can be useful when a host needs to change venues or start time, for instance.
Emails are not sent for every change; an event host needs to check the box on the Edit Event page confirming they want to notify attendees. If the box is not checked, no emails will be sent.

By default, the email looks something like:
If your Edit Event pages do not have a checkbox, you may need to add this functionality to the event_create.html template in your templateset:
{% if update %}
<div>
    <input id="id_send_details_changed_email" type="checkbox" name="send_details_changed_email" value="1">
    <label class="ak-checkbox-label" for="id_send_details_changed_email">
        Send an email to attendees notifying them of the event details changing
    </label>
</div>
{% endif %}
If you do not want this functionality on your Edit Event pages, remove this checkbox from your templateset.
To customize the appearance or content of your ‘Details Changed’ notification email, edit the event_email_details_changed.html template in your templateset.
Not every detail is worth notifying attendees about, so an email will only be sent if the box is checked AND one or more of the following details has changed:
campaign
title
starts_at
ends_at
venue
public_description
directions
note_to_attendees
address1
address2
city
state
region
postal
zip
country
Merging Events
You can use the event merge feature to combine two events into one.
This capability can prove useful if you’ve accidentally created multiple copies of an event, or if you’ve decided that two nearby events would be more effective as a combined larger one.
To merge events, click the Merge link on the event detail screen of one event, then use select menus on the merge screen to select the second event.
After selecting two events, you can choose which event ID to preserve, which event venue and location to use, and which description should be shown for the combined event.
You can optionally send an email message to the hosts of both events explaining the merge. You can also choose whether to send an email message to the attendees of the event that is being merged about the change.
When you merge the events, all of the host and attendee signups are transferred from the source event to the target. The source event is marked as deleted, and any links which refer to that event will be redirected to the target event.
Tracking Attendance
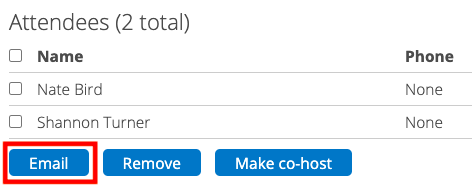
Hosts are shown a column called Attended in the attendee section of their host tools page. This column shows automatically at the scheduled start-time. We use the location of the event to determine start time in UTC so the start time should be accurate for the host.
To mark attendance, the host checks the box next to the name of every attendee, then clicks Change attendance. You can also do this using the Act as host option on the event management screen. If someone is mistakenly marked as having attended, this can be corrected by checking the box next to the name and clicking Change attendance again.
Attendance is saved in events_eventsignup.attended.
You can see a count of all attendees, just above the count of signups on the event campaign dashboard. On the event management screen you can see the numbers for each individual event in this format: 2 attendees out of 2 sign-ups.
When an attendee cancels their signup, that signup will have a status of cancelled. When a host (or admin acting as a host) removes a signup, that signup will have a status of deleted in events_eventsignup. If the attendee signs up again for the same event, the row will update its status to active.
Closing Public Event Creation
When Let Users Host Events is checked on the Campaign Settings screen, your users are able to host events and access their host tools page.
If you want to prevent your users from creating new events for this campaign, hide the Event Creation page instead of unchecking “Let Users Host Events,” otherwise your existing event hosts will lose access to their host tools page.
When you hide an event campaign’s Event Creation page, hosts, moderators, and staff can still update existing events, but the event creation page is hidden for everyone else.
Bulk Editing Events
For Events, you can approve, confirm, delete, make private, and make public multiple events at once from the event list screen.
To bulk edit:
1 From the Browse All screen (or from the Event List screen for events), click on the “Bulk Edit” link in the top left next to “Show Hidden”.
2 Choose the items that you want to apply the action to – you can click to select specific items, or select all items visible on the screen.
3 Click the Save button, review the count of objects to be changed, and confirm.
You’ll then see a reportback with the number of changes actually made. This may differ from the preliminary count if, for example, an object you try to apply a tag to already has that tag.
Event Moderation
Distributed events are a powerful tool, but being user-generated, events often need to be individually reviewed before being made public or promoted. Some events will be ready to go and just need to be given the green light. Other times, it’ll be necessary to inform hosts that they’ve misunderstood hosting requirements, or maybe they need to select a different venue for their event. Occasionally, an event will be created by a malicious user and should be deleted.
The moderation tool enables approved volunteers to access and review events that other users have created. Moderators find events using a dedicated event search, with options including filtering by event status. They can also contact hosts and attendees, mark an event incomplete, or delete it outright. If a campaign requires events to be approved, moderators can do that, too.
Event moderation can be enabled from your Campaign Settings screen for any campaign. Under “Event Creation Settings” check “Allow users to moderate campaign events.”
Save your settings and you’ll land on the Campaign Dashboard. The page list will show two new pages, one for Campaign Volunteers and one for Event Moderation. Finish creating these pages to get started with moderation.
The campaign dashboard will also include a new “Manage Volunteers” section. And under “Advanced Search”, you’ll see a new option, “Moderated events only.”
Campaign Volunteer Page
Before a volunteer can moderate, they must sign up to volunteer and be approved by a staff user. You can customize the text and add ground rules to be included on this page, as with other event pages. When an end user submits on a Campaign Volunteer page, a pending volunteer record is created. The volunteer is added under “Awaiting Approval” on the Campaign Dashboard.
You may want to add a notification to the Campaign Volunteer page so a staff user is immediately notified about the pending volunteer request.
Volunteers must be approved before they can view and moderate your events.
Volunteer List
When moderation is enabled for a campaign, the campaign dash will include a new “Manage Volunteers” section. Click on one of the statuses (Active, Awaiting Approval or Deleted) to view a list of volunteers.
From this list you can approve or delete volunteer moderators and view their status. The list shows the volunteers history of event actions including how many events the volunteer has moderated, hosted and attended.
Volunteers can be approved or deleted individually or with a bulk edit. An email is sent to volunteers when they’re approved. The content of this email comes from the event_email_volunteer_approved.html template of the templateset selected for the Campaign Volunteer sign up page.
Warning: Moderators can communicate with hosts and attendees of an event and delete events outright. Review them carefully before approving.
Event Moderate Page
You’ll actually be setting up two pages when you create the Event Moderate Page – the Event Search page and the Moderator Tools page.
Event Search
The Search Page Text box on the Edit Content step is where you enter instructions and information for moderators to be displayed on the Search Page.
This page is what moderators will typically use to find events for review. Moderators run the default search by clicking Show Events. Or, moderators can find events meeting specific criteria using advanced search. If the campaign requires event approval, the default search will retrieve events awaiting approval. Moderators can also select the sort order of results.
Search results appear beneath the advanced search form. A count of matching events will be included above the results.
Many details about an event are included in the event search results. You can modify what’s shown by editing the event_search_moderator.html template.
You can also direct moderators to events they should review by assigning an action notification to event create or event signup pages to notify moderators when an event is in need of review. For example, this could be triggered by someone creating an event, or the first attendee signing up to attend. The action notification could be configured to send to a random campaign moderator, asking them to review the event.
To do this, create a notification that randomly picks the email of an approved moderator. The emails of campaign moderators are accessible as an attribute of the campaign. In the context of an action notification, this snippet would randomly choose a moderator email address: {{ action.event.campaign.moderator_emails|random }}. Use this as the To for the new notification.
In body of the notification, pull in details about the event and include a link to moderator event search.
Hello,

You're receiving this message because you are a moderator for {% client_name %}'s {{ action.event.campaign.title }} event campaign. An event in this campaign is now in need of review:

<p><strong>Event Details</strong></p>
<p>Current Status: {{ action.event.status_summary_display }}</p>
<p>Venue: {{ action.event.venue }} - {{ action.event.formatted_address }}</p>
<p>Host{{ action.event.hosts|length|pluralize }}: {% for host in action.event.hosts %}{% if not forloop.first %}, {% endif %}{{ host.name }}{% endfor %}</p>
<p>Starts at: {{ action.event.get_starts_at_display }}</p>

To review this event from your moderator tool, visit {% client_domain_url %}event/{{action.event.moderate_page.name}}/{{action.event.id}}/moderate/?akid={{ recipient.token }}
Moderator Tool
Once a moderator has found an event to review, the Moderate button present on search results leads to the event’s Moderator Tool, where moderation activity occurs.
From the Moderator Tool, a moderator can review event details, email host(s) and attendees, and upload attendees if the event has already occured. Moderators can also mark events as incomplete, deleted, or, if the campaign requires approval, approved. When marking an event, moderators must record a comment explaining their choice.
An action is recorded when moderators mark an event, regardless of how they mark it. In addition to the required comment, additional fields and content can be added to the moderation form via the Custom HTML field on the Edit Content step for the the Event Moderate page.
If staff need to know when a moderation action occurs, an action notifications can be assigned to the moderation page with information about the action. There’s a built-in notification, Event Moderation, that can be configured to notify staff.
If a moderator marks an event approved, the event’s status is changed and the host is notified that their event’s been approved. Marking an event deleted will remove the event from public event search, set the event to deleted, and cancel and notify all signups. Apart from being able to change custom event fields, marking an event incomplete does not otherwise change the event.
Moderators can send email to hosts or attendees. The process for this resembles hosts contacting attendees. The from-line for these emails uses the name of the moderator, but the email address comes from the ActionKit User Generated Emails setting. The moderator’s name and email are used for reply-to, so they’ll receive any replies. The initial email from moderators will be recorded in the email log, but subsequent messages will not.
Event Mailings
Transition note: This section describes how to use the event snippets added January 2019, labeled (New) in the mailer’s snippet list. For help tweaking older snippets, refer to the withevents docs. For emails like those sent from hosts to attendees, volunteer approval, event cancellation, and others, see Custom Emails.
You can use the mailer to recruit hosts and attendees, send reminders and more. You’ll usually choose a landing page and/or targeting to tell the mailer which campaign you’re targeting, then use the built-in snippets.
If what you want to do isn’t described below, the custom tag reference lists many more attributes and search options, including those using the withevents tag.
Host Recruitment Emails
The initial host recruit is just like the ask for actions like petitions. Include a link to the event creation page for your campaign and target the users you want to recruit as hosts.
You can send a followup host recruit to places that have no local event by excluding people near events using the Event campaigns and Campaign radius targeting options. You can also further narrow your audience: for example, you could use City/Postcode Radius to only recruit for hosts in certain cities.
Attendee Recruitment Emails
For the attendee recruitment emails, you’ll want to limit to people with events nearby. Insert the (New) Attendee Recruitment snippet from the Compose screen:
{% for event in events|slice:":1" %}

Event: {{ event.title }}
{{ event.starts_at_dt|date:"l, F jS, G:i a" }}
{{ event.venue }}
{{ event.city }}, {{ event.state }}
http://staging.actionkit.com/event/{{ event.signup_page.name }}/{{ event.id }}/signup/?no_redirect=1
{% endfor %}
You no longer need to specify the Event Campaign or the radius in the snippet. Instead, select your Event Campaign on the targeting screen and set a radius to limit to users near events. You can still edit the snippet if you’d like to show more than one event to the user. Replace slice:”:1” with the number you’d like to include.
Check “Campaign Same [State/District] Only” if you want to recruit users to events within their U.S. state or Congressional district.
Alternatively, you can include the link to the attendee sign up page for your event campaign. End users following this link will land on the public search page where they can search for a nearby event.
To show events in order from least full to most full, adjust the above to use {% for event in events|dictsort:"least_full" %}. Events with the most number of open spots for attendees are sorted toward the beginning; events with the least number of spots are sorted toward the end, followed by events with no maximum attendee limit.
Reminders to hosts and attendees
The (New) reminder snippets, work with a merge query. There is a built-in merge query for reminding already-signed-up hosts or attendees about their upcoming events:
On the Compose screen, look for Merge Data in the Basics section and click to add a merge query.
Enter event_signups as the name of the mergequery
Enter your campaign’s short name for “Campaign name” and either ‘host’ or ‘attendee’ for “Role” as appropriate.
In your mailing body insert the Events > (New) Host Reminder/Followup snippet (or the attendee version as appropriate).
On the Target screen, check the Special Criteria > Merge Query box.
This will limit to hosts (or attendees) with an open, upcoming event, and merge details of their event into the mailing body.
Another built-in merge query,”Event signups by date” (event_signups_by_date), can be used to remind about events on a specific date (tomorrow, yesterday, or other). Using “1” for “days away” reminds users of events tomorrow (in the UTC time zone, as mentioned in the query’s help text). You can use the same query with “-1” as “days away” to send a followup survey the day after the event.
You can further customize what events and users you include with custom SQL in a merge query. For situations not easily solved with SQL, you might also want to look at options using Django templating, discussed in the withevents tag reference. Those include withevents options like days_away and attributes like event.is_full that template code can access.
More customizations
Merge queries and merge files allow a lot of flexibility in which events you show users. As usual, the first column is the key used to match targeted users to the query results. Your merge data can have user_id (or any other lookup key listed here, and a column named “event_id” or “event_ids”. Multiple events can be separated by , or ;.
When building a mergequery, you can group by the lookup key and use the MySQL code GROUP_CONCAT(DISTINCT event_id) as event_ids to generate comma-separated lists of events.
Many existing mailings and templates use the withevents tag. For some uses of withevents, you may be able to simply remove the tag and make sure that your mailings use a landing page. Test to be sure!
To see additional event information accessible from mailings, and additional event search options, look at the withevents tag reference.
Sometimes, you may want to merge event information when it’s available, and show nothing if not. For example, you might send a full-base newsletter that mentions nearby events if there are any. In that case, you can remove the requires_value events tag from the standard snippets, so that the event section will be skipped but the message will still be sent if no events are found.
Custom Emails
There are many types of emails related to your events that can be sent that aren’t mailings. These include sending an email:
To a host when their event is approved by a staff or a moderator
To hosts and/or attendees, from a staff member, host, attendee, or moderator
To hosts and attendees when an event is cancelled
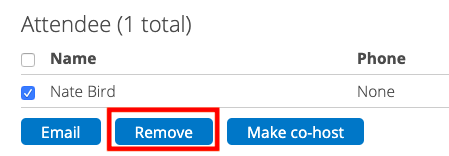
To an attendee, when they are removed from an event
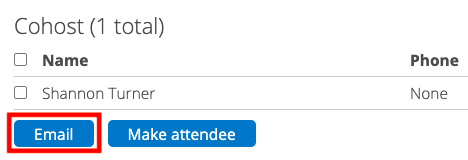
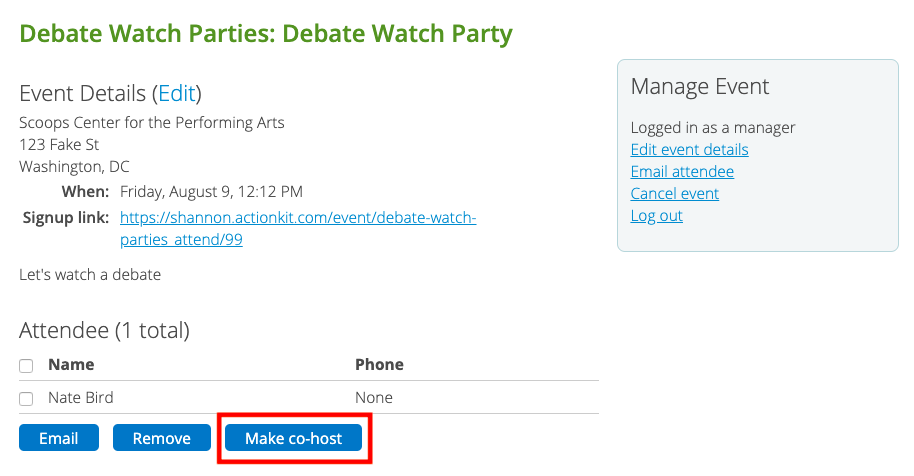
To an attendee when they are promoted to a host, or to a host who is demoted to an attendee
To hosts and attendees when important event details (like a venue or address) change
To a moderator when they have been approved to serve as a volunteer
It’s important to note that it’s also possible to do many of these actions without sending an email about it, like removing an attendee without letting them know.
These emails (mostly) happen automatically, and customizing them previously required making changes to your page’s templateset.
You can still edit your templateset’s pages like event_email_cancelled.html to customize what the event cancellation email looks like, but there’s now an easier way to make customizations.
Custom Emails allow you to customize the subject line and email body of transactional event emails related to their page. Event emails use what is set in your page’s templateset unless you customize them on the Custom Emails screen of your page.
Custom Emails are especially useful when you generally like what you have in your templateset, need to customize the event emails for one or more event campaigns, and don’t want to create and maintain a separate templateset.
You can customize just the subject line, just the email body, or both for a specific type of email. When you do, it will ignore what’s in your templateset in favor of what you’ve provided.

The above screenshot shows the Custom Emails screen of an Event Create page, with an “Event Cancelled” Custom Email created. In this example, the email body has been customized, though the subject has been left blank, so it will use what’s in this Event Create page’s templateset’s event_email_cancelled.html.
Most Custom Emails are customized on the Event Create page, but “Event Details Changed” and “Volunteer Approved” emails are set on the Signup and Volunteer pages, respectively.
Some Custom Emails are customized on multiple page types. For example, event_email_from_host.html can be customized on both the Event Create and Event Signup pages. Customizing event_email_from_host.html on Event Create pages will customize the email that is sent from event hosts to their co-hosts; customizing event_email_from_host.html on Event Signup pages will customize the email that is sent from event hosts to their attendees.
If your event has translated pages, you need to customize your Custom Emails on all of those pages or they will inherit from that page’s templateset. This is important to remember since many clients use different templatesets for different languages.
Warning
Be careful and test thoroughly when customizing your event’s Custom Emails! Make sure you test your Custom Emails carefully when customizing them! If there is an error in your Custom Email, your customized emails could fail to send altogether.
For reference, below is a set of screenshots demonstrating some of the ways that you can send these emails, grouped by where you set the Custom Emails.
Event Create Custom Emails
Event Approved
Emails sent to hosts when their event is approved, if your campaign requires staff approval for events.
Email from Staff
Emails sent from your staff members who are logged in to ActionKit to hosts, or emails sent to hosts when staff merges an event.
Email from Attendee
Emails sent from attendees to their event hosts.
Email from Moderator
Emails sent from event moderators to event hosts, if your campaign has moderation enabled.

Email from Host
Emails sent from event hosts to their co-hosts.
Event Cancelled
Emails sent to hosts and attendees when an event is cancelled.
Attendee Removed
Email sent to an attendee when they are removed from an event by a host.
Role Changed
Email sent to an attendee or host when they are promoted to host or demoted to attendee.
Event Signup Custom Emails
Email from Host
Emails from hosts sent to their event attendees.
Email from Staff
Emails sent from your staff members who are logged in to ActionKit to attendees, or emails sent to attendees when staff merges an event.

Email from Moderator
Emails sent from event moderators to attendees, if your campaign has moderation enabled.
Event Details Changed
Emails sent to hosts and attendees when the significant details of an event change.
Campaign Volunteer Custom Emails
Volunteer Approved
Email sent to campaign volunteers when they are approved to moderate events.

Event Reports
There is a built-in dashboard report that will show some basic event counts. This report is called Event Report. Click on the report name and then enter your campaign name to run the report.
This report also provides examples of the tables and joins you may want to use in constructing your own event-related reports.
We have also provided a few other built-in reports associated with events:
Events: Events With Few RSVPs: Returns a list of events that only have a few RSVPs signed up.
Events: List of Almost Full Events: Returns a list of events that are nearing their max attendee limit.
Attendees of upcoming events: Used for mailer targeting of attendees.
Hosts of upcoming events: Used for mailer targeting of hosts.
International & Multilingual Events
You can organize events in other countries using ActionKit and access most of the functionality described above.
You can also set up translations of your event creation and attendee sign up pages within an event campaign. The first step is to click the small blue add translations link on the campaign dashboard. Select the language from the drop down to add event creation and attendee signup pages in one or more additional languages.
For international events, you’ll want to include a country drop down in the user form, which you can do by clicking Customize fields in the User Form Field section if you’re using a modern templateset or by editing the user form template. Including the country field tells ActionKit to treat this event campaign as an international one.
In that case, we won’t require zip or postal code since some countries don’t have postal codes. Instead, the host will see an error message if ActionKit can’t find the event on a map (either by post, zip or city). If the user selects US we’ll still save their postal code to the zip code field.
Also, ActionKit will automatically display the country drop down on the event search screen, where attendees can look for a nearby event. Users can enter a postal code or a city and the country to find nearby events.
Event management is the same. Staff can search by city and country for events from the event campaign dashboard.
International event mailings are mostly the same.
You can target by radius for international events, just like U.S. events. International users are geocoded using a data source called Geonames.org. We get the user’s lat/long wherever we can from postal codes where we have the data, and city otherwise. This allows you to target mailings to users who are near an event.
You can also use the event snippets on the compose screen for international events. For example, the attendee recruit snippet will use geocoding to show your targeted users an event near them.
Additionally, you can translate the event campaign name and short title when you set up the translated host sign up page and the campaign name will show in the correct language in your email. We’ll automatically link to the translation in the user’s language in your emails - so if you insert the attendee recruitment snippet in your mailing, Spanish speakers will automatically be directed to the Spanish translation of the attendee sign up page.
Online and Virtual Events
You can use ActionKit to organize virtual events that take place online rather than face-to-face at a physical location.
Each event campaign can optionally include events from any or all of the below types:
In-Person Events: Offline events held face-to-face in a specific location. Creating an event requires an address for the event location, which can be shown on a map and provided to attendees. The directions field may be used to provide information about navigating to the event venue.
Local Virtual Events: Online events with a geographic focus in a particular location. Creating an event requires an address used to locate the area of interest for the event, but that address is never shown to attendees except as a map pin. The directions field may be used to provide information about connecting to the online service used to host the event.
Global Virtual Events: Online events with a worldwide audience. Creating an event requires a city and state or country to determine the event’s local timezone, but that location is never shown to attendees. The directions field may be used to provide information about connecting to the online service used to host the event.
Event Organizing And Logistics
In-person events are among the trickiest actions to organize nontechnically as well as technically. The first time you run an event campaign, it may be worth talking with someone who’s run them before to think about the logistics and strategy. Many things can go wrong running events and nothing substitutes for experience.
Basics
It’s important to have an outside goal/theory of change - just throwing parties without a purpose isn’t enough. Maybe the events are to kick off a campaign, help set the direction of your organization, deliver a petition, release a report to attract media attention, or rally outside the offices of targets like Congresspeople. Fun can be helpful as part of the hook, too - e.g., throw in a movie night/potluck/etc. along with some action to take.
In one large organization with lots of experience running parties, there was one party for every 10,000 people emailed and 5-6 attendees signed up per event. Smaller, newer mailing lists may have better ratios because they have fewer inactive members, but you should realize that you may have dozens of events, not hundreds, and hundreds of attendees, not thousands.
If you have (or can have) organizers but don’t have a huge email list, you might want them hosting events themselves or recruiting hosts.
Logistical Gotchas
People need reminders. Expect half of the attendees not to show up anyway; even a few hosts may flake.
Think about what event hosts will need for a successful event (DVD player? Computer with speakers?) and make sure to list it in the Host requirements section on your event creation page.
Any other assistance you can give leading up to the event or on the day of is good. Setting up an email address - and maybe findng volunteers to help staff it if there are likely to be a lot of messages - will help you deal with the inevitable surprises.
It’s helpful to send hosts a step-by-step guide they can follow. You can search for some host guides MoveOn.org produced for their events:
Sending hosts physical materials, like a DVD for a movie night or a sign for a rally, tends to add a lot of complexity. If you can, avoid it; otherwise, make sure to leave plenty of time for it to get there, repeatedly check in with hosts to make sure they get their materials, and have a backup plan for hosts that never get it.
Followup
Follow up surveys to hosts and attendees are a great way to further involve these folks and to improve your future events. It’s best if you do this within a day or two of the event.
Event hosts and attendees are some of your best activists. A sign-in sheet to get walk-in guests added to your system is smart; asking event attendees to commit to another specific action later is smart; targeting hosts for the biggest “high-bar” actions like calling Congress, writing letters to the editor, or donating is smart.