AMP for Email
AMP for Email lets you send dynamic emails that behave more like a webpage than a standard email. AMP emails have interactive components like forms, clickable buttons, lightboxes, and other extended functionality like a modern app – all without leaving the email itself!
AMP stands for Accelerated Mobile Pages, a format for creating websites that uses restricted HTML and caching to make pages load quickly. AMP for Email uses a mix of standard and non-standard HTML.
Note
AMP is an experimental, new technology and is currently only supported by Gmail and a few other email providers. Not to worry – email clients that do not support AMP will display the HTML version of your mailing like you’re already used to.
Since AMP is not fully supported by all email clients, it’s important that you write the HTML portion of your email as normal. Think of AMP emails as a bonus, not a replacement for your existing email program.
To help you get started more quickly, we’ve provided a basic AMP-compatible email wrapper, but you will need to customize the AMP Template of your email wrapper in order to match your organization’s branding and may need to customize it further to incorporate other AMP components like lightboxes or animated GIFs.
Note
Our standard AMP-compatible email wrapper includes functionality that tracks when users interact with your AMP mailing by clicking/tapping within the email itself. This information is stored in the core_amptap database table. If you don’t wish to collect or store this information, you can remove the openform from your wrapper and the event listener from the <body> tag of your email wrapper.
These interactions are not recorded for proof mailings, so you can click/tap within a proof mailing without worrying about recording an AmpTap for your users. But remember that submitting a form in the proof mailing will result in an action being recorded, which can include a confirmation email being sent to the user if you have one configured.
Before you can use ActionKit forms in your AMP emails, you need to add https://mail.google.com as an Allowed Origin under CORS Settings on the Configuration screen. (Strictly speaking, without this as an Allowed Origin, actions will be processed, but the form success message won’t display to your users, making it seem like your form did not work)
Writing AMP Mailings
On the Compose screen of your mailing under Content, is a section for the AMP HTML Body. This is where you will write your AMP content. Since AMP HTML is non-standard HTML, the Visual Editor is not available for the AMP HTML Body, but you’ll be able to preview your work in the Preview pane.
Note
If you’re not using an AMP-compatible wrapper, the AMP HTML Body and AMP preview option will be hidden until you choose an AMP-compatible wrapper.
As you compose your AMP HTML Body, it will be checked for any invalid HTML tags.
If your AMP HTML Body is valid AMP HTML, you’ll see the message “Previewed AMP HTML Body passed validation!” below the text box. If your AMP HTML Body has errors, the validator will tell you what the errors were. If the errors were found in the AMP HTML Body, the validator will also tell you the line number so you can easily fix it; if the errors were found in the email wrapper, you may need to edit your email wrapper before you can send your mailing.
Note
Validation is based on the previewed AMP HTML Body. If you are using conditional content in your message, the line numbers reported in error messages may be approximate. When using conditional content, be sure to preview and validate your message for many users.
Note
If you send an email that fails AMP validation, your recipients will see the HTML version of your mailing, just like you’re already used to.
AMP for Email Guidelines
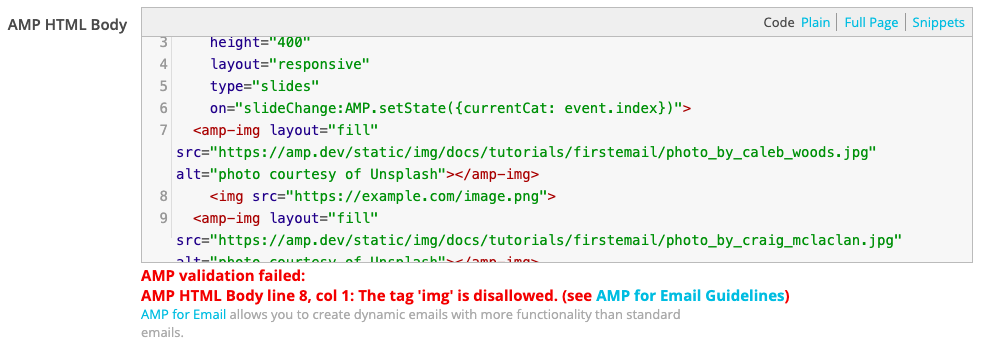
Some common HTML tags like <img> are not allowed in AMP. Instead, you must use <amp-img> and provide the width and height attributes. Consult the AMP for Email fundamentals documentation for more details.
Including disallowed tags like <img> will cause your AMP HTML to fail validation.
Use the Preview pane to see how your AMP email will display to your recipients. As you edit your AMP HTML Body, the Preview pane will automatically update. You can switch between viewing the HTML preview or the AMP preview using the provided buttons, and the Mobile preview is available for both HTML and AMP as well.
Unlike standard emails, AMP emails can make use of forms and limited Javascript in order to add extra functionality to your AMP emails.
Registration
Before you can send AMP emails to your list, you will need to register with Google and send a real, production-quality email to Google as part of your application.
Be sure to carefully check that you meet all registration guidelines before registering.
Note
If you have multiple from line email addresses that you want to send AMP emails from, you will need to register each of those separately.
Common Issues
If there are AMP components present in your email wrapper (for instance, the required Javascript necessary to enable AMP forms) but you are not using these components in your mailing, your AMP email will fail validation. Since you must include Javascript in the <head> of your mailing, you’ll need to insert it in the AMP Template portion of your email wrapper and not in your AMP HTML Body. To get around this problem, you could either make multiple email wrappers with different AMP Templates including only the Javascript you need, or better yet, create custom mailing fields that can be include the necessary Javascript on the fly.
If you’re including an <form> in your mailing, be sure to use the action-xhr attribute and NOT action or target. If your action-xhr is pointed at ActionKit (like https://roboticdogs.actionkit.com/act/), you’ll need to use the page attribute with the short name of your page just like when you normally embed a form on a page. Keep in mind that XHR URLs may not return HTTP Status 302 (Found) and must belong to the same domain zone as the email address you’re sending from, or the AMP action will fail.
Normally, after performing an action on an ActionKit page, URLs return HTTP Status 302 (Found), so you must specify a hidden form field with a name of response_type and a value of json as shown in the example form below in order to override this behavior, or your forms will not work.
All URLs in use in your AMP HTML must use HTTPS and match your domain zone.
When you (or your users) forward an AMP email, the AMP portion will not be included.
Note
If your AMP email contains an ActionKit form, keep in mind that when you get proofs, submitting the form in the proof to confirm everything is working will result in an action being recorded, which can include a confirmation email being sent to the user if you have one configured. Remember the warning from Send Proofs: Don’t submit on the page from a proof unless you intend to record an action. (In this case, submitting the AMP Form is just like submitting the form on the page in an HTML email.)
To confirm that the AMP form works correctly, you can specify your own user when getting a proof.
Example Form
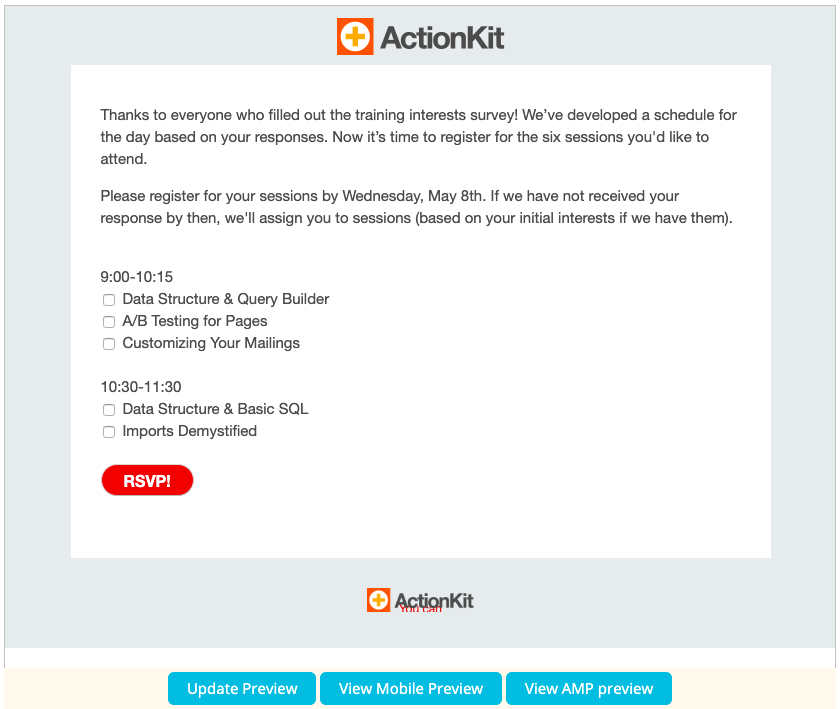
Embedding forms in your AMP emails is a great way to replicate the functionality of a page inside of your mailing. All you need to do is to copy the HTML for the form elements into your AMP Body. Here’s a sample form that acts as a survey page.
If you use this, you’ll need to make a few changes before it works for you:
Update the
action-xhrattribute of the form to match your ActionKit instanceUpdate the
valueattribute of the hidden form page field to match your page’s short name.Update the checkboxes and any other form fields to match your page.
Note
Any form field requirements on your page MUST be reflected in your AMP form as well, or you won’t be able to submit the form and it won’t be clear why. This is why <input type="hidden" name="email" value="{{ user.email }}"> is included in the example below. At a minimum, email is a required field for every form. But since we already know the user’s email, we can include it as a hidden form field if we want.
As an alternative to using action-xhr="https://docs.actionkit.com/act/", you can instead use action-xhr="https://docs.actionkit.com/rest/v1/action/" to use the REST API for action processing which in some cases can provide more feedback on errors.
For example, if you are using the REST API for action processing and you forget to include <input type="hidden" name="email" value="{{ user.email }}"> in your form, attempting to submit the form will result in a failure message.
As noted above, if you are using /act/ to process actions and forget a required field like email, you won’t be able to submit the form and it won’t be clear why! The drawback of using the REST API instead of /act/ for action processing is that the REST API can be more permissive, ignoring required fields on your pages.
Note
Don’t forget to include hidden inputs in your form for source and mailing_id like in the example below, or actions will not be correctly attributed to your mailing! If you don’t provide a source, the source for these actions will default to website, which isn’t accurate in this situation.
If you prefer, you could use a source like amp-mailing to more easily differentiate whether an action came from a standard HTML mailing or an AMP mailing, but don’t forget to include the mailing_id – that’s key to ensuring that the action is tied to this mailing.
<form method="post" action-xhr="https://roboticdogs.actionkit.com/act/">
<input type="hidden" name="page" value="2019-training-session-rsvp">
<input type="hidden" name="email" value="{{ user.email }}">
<input type="hidden" name="response_type" value="json">
<input type="hidden" name="source" value="mailing">
<input type="hidden" name="mailing_id" value="{{ mailing_id }}">
<div id="ak-survey-questions">
<div>
<div>
<br>
<label>
9:00-10:15
</label>
<div>
<label><input type="checkbox" name="action_2019trng_9a" id="id_action_2019trng_9a_data_structure_query_builder" value="Data Structure & Query Builder"> Data Structure & Query Builder</label><br>
<label><input type="checkbox" name="action_2019trng_9a" id="id_action_2019trng_9a_a_b_testing_for_pages" value="A/B Testing for Pages"> A/B Testing for Pages</label><br>
<label><input type="checkbox" name="action_2019trng_9a" id="id_action_2019trng_9a_customizing_your_mailings" value="Customizing Your Mailings"> Customizing Your Mailings</label><br>
</div>
</div>
<div>
<br>
<label>
10:30-11:30
</label>
<div>
<label><input type="checkbox" name="action_2019trng_1030a" id="id_action_2019trng_1030a_data_structure_basic_sql" value="Data Structure & Basic SQL"> Data Structure & Basic SQL</label><br>
<label><input type="checkbox" name="action_2019trng_1030a" id="id_action_2019trng_1030a_imports_demystified" value="Imports Demystified"> Imports Demystified</label><br>
</div>
</div>
<div>
<br>
<label>
11:45-1:00
</label>
<div>
<label><input type="checkbox" name="action_2019trng_1145a" id="id_action_2019trng_1145a_advanced_page_and_mailing_snippets" value="Advanced Page and Mailing Snippets"> Advanced Page and Mailing Snippets</label><br>
<label><input type="checkbox" name="action_2019trng_1145a" id="id_action_2019trng_1145a_building_dashboards_using_google_charts" value="Building Dashboards & Using Google Charts"> Building Dashboards & Using Google Charts</label><br>
<label><input type="checkbox" name="action_2019trng_1145a" id="id_action_2019trng_1145a_customizing_your_templatesets_with_custom_page_fields" value="Customizing Your Templatesets with Custom Page Fields"> Customizing Your Templatesets with Custom Page Fields</label><br>
</div>
</div>
<div>
<br>
<label>
1:00-2:00
</label>
Lunch (provided)
</div>
<div>
<br>
<label>
2:00-3:00
</label>
<div>
<label><input type="checkbox" name="action_2019trng_2p" id="id_action_2019trng_2p_building_dashboards_using_google_charts" value="Building Dashboards & Using Google Charts"> Building Dashboards & Using Google Charts</label><br>
<label><input type="checkbox" name="action_2019trng_2p" id="id_action_2019trng_2p_data_structure_basic_sql" value="Data Structure & Basic SQL"> Data Structure & Basic SQL</label><br>
</div>
</div>
<div>
<br>
<label>
3:15-4:15
</label>
<div>
<label><input type="checkbox" name="action_2019trng_315p" id="id_action_2019trng_315p_mailing_wrappers_templates" value="Mailing Wrappers & Templates"> Mailing Wrappers & Templates</label><br>
<label><input type="checkbox" name="action_2019trng_315p" id="id_action_2019trng_315p_recurring_mailings" value="Recurring Mailings"> Recurring Mailings</label><br>
<label><input type="checkbox" name="action_2019trng_315p" id="id_action_2019trng_315p_advanced_events" value="Advanced Events"> Advanced Events</label><br>
</div>
</div>
<div>
<br>
<label>
4:30-5:30
</label>
<div>
<label><input type="checkbox" name="action_2019trng_430p" id="id_action_2019trng_430p_list_hygiene_reengagement" value="List Hygiene & Reengagement"> List Hygiene & Reengagement</label><br>
<label><input type="checkbox" name="action_2019trng_430p" id="id_action_2019trng_430p_advanced_sql" value="Advanced SQL"> Advanced SQL</label><br>
<label><input type="checkbox" name="action_2019trng_430p" id="id_action_2019trng_430p_customizing_your_mailings" value="Customizing Your Mailings"> Customizing Your Mailings</label><br>
</div>
</div>
</div>
</div>
<br>
<input type="submit" value="RSVP!" style="-webkit-border-radius: 16px; -moz-border-radius: 16px; border-radius: 16px; background-color: #dd0000; display: inline-block; padding: 0 22px; margin-bottom: 10px; line-height: 200%; height: 32px; color: #fff; font-size: 16px; font-weight: bold; text-transform: uppercase; font-family: 'Open Sans', 'Helvetica Neue', Helvetica, Arial, sans-serif; text-align: center; text-decoration: none;">
<div submit-success>
<template type="amp-mustache">
Thanks for RSVPing for your training sessions! We'll see you in Chicago!
</template>
</div>
<div submit-error>
<template type="amp-mustache">
Something went wrong -- <a href="https://shannon-sf.actionkit.com/survey/2019-training-session-rsvp/">RSVP for your sessions here</a> and we'll see you soon!
</template>
</div>
</form>